Thursday, July 28, 2011

How to Draw a Goldfish in 4 Steps

A goldfish is a popular pet for peo­ple of all ages. You can draw one and imag­ine it swimming happily in its fish bowl or in a pond.

How to Draw a Goldfish in 4 StepsIn this section, we'll show you how to draw the above goldfish. Either draw it freehand while looking at your computer monitor or print out this page to ­get a closer look at each step.

Follow the red lines in each illustration to learn exactly what to draw in that step. The lines drawn in previous steps are shown in gray. We­'ll show you an illustration of each step and then give you a description of how to draw it.

How to Draw a Goldfish in 4 Steps1. Draw the Body

Start with a sideways teardrop for the body. Draw­ two ovals at one end for the tail. Add more ovals or circles for the eyes and pupils.

Now it looks like a blob, but in the next step you'll add fins and some water.

How to Draw a Goldfish in 4 Steps2. Draw Fins

Draw three fin shapes, one on top and two on the bottom. Add some circles for bubbles, and draw curves for the gills and mouth.

You're not done yet -- what's a fish without scales? Add scales and other details on the next page.

How to Draw a Goldfish in 4 Steps3. Add Scales

Add cur­ved lines for the scales on the side.­ Draw lines for the details on the fins.

The fish is almost done! Take a look at the next page to learn how to add the finishing touch.

How to Draw a Goldfish in 4 Steps4. Trace with a Pen

Use a felt-tip pen to trace over the lines you want to keep, and erase the extr­a pencil lines

Congratulations! Your goldfish drawing is complete. If you don't like your finished drawing, you can prac­tice drawing it again until you get it just right.

Monday, July 25, 2011

How to Draw an Alligator in 6 Steps

Alligators are amazing reptiles found in­ only the southeastern United States and China. Learning to draw this impressive animal will hone your artistic talents.

In this section, we'll show you how to draw the above alligator. Either draw it freehand while looking at your computer monitor or print out this page to get a closer look at each step.

Follow the red lines in each illustration to learn exactly what to draw in that step. The lines drawn in previous steps are shown in gray. We'll show you an illustration of each step and then give you a description of how to draw it.

How to Draw an Alligator in 6 Steps1. Draw the Body and Head

Draw a large oval for the body, then another smaller oval for the head and snout. Add two rounded rectangular shapes for the curving tail. In the next step, we'll draw a few more shapes to prepare to draw the rest of the body.

How to Draw an Alligator in 6 Steps2. More Ovals

Add more ovals for the top of the head, the nose, and the upper part of each leg on this side. Next, we'll finish the legs and add some eyes.

How to Draw an Alligator in 6 Steps3. Draw Legs and Eyes

Draw rounded rectangles for the lower legs. Sketch two circles with black dots in the center for the eyes. Don't forget to include the white dot in the pupils.

How to Draw an Alligator in 6 Steps4. Face and Belly

Add ovals for the nostrils. Draw curved lines for the mouth, eyebrows, belly, and underside of tail. You're almost done! The next step is to add some scales and claws.

How to Draw an Alligator in 6 Steps5. Sketch Claws and Scales

Sketch triangle shapes for the claws. Add lines on the belly and tail to show scales. Draw lumps along the back for more scale details.

How to Draw an Alligator in 6 Steps6. Trace with a Pen

Use a felt-tip pen to trace over the lines you want to keep, and erase the extra pencil lines

How to Draw an Alligator in 6 StepsFrom water to land, we move from alligators to camels, an animal that's just as easy to draw as alligators with our step-by-step instructions.

Thursday, July 14, 2011

How to Draw Oviraptor in 7 Steps

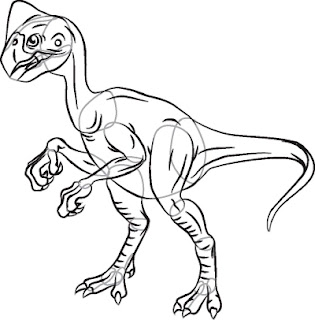
The Oviraptor dinosaur's most intimidating feature are its sharp, large claws. Pay close attention to details when drawing this dinosaur.

In this section, we'll show you how to draw this Oviraptor dinosaur. You can draw it freehand while looking at your computer monitor, or you can print out this page to get a closer look at each step.

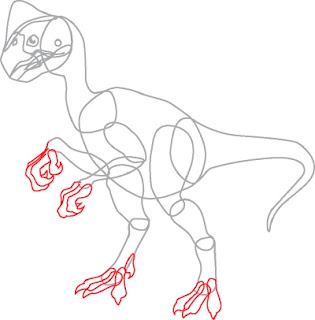
­ Here, we'll show you an illustration of each step and then give you a description of how to draw it. Follow the red lines in each illustration to learn exactly what to draw in that step. The lines drawn in previous steps are shown in gray.

Are you ready to get started? Check out the next page for the first step.

How to Draw Oviraptor in 7 Steps1. Draw the Head and Body

Start with two potato shapes -- a large one for the body and a smaller one for the head. Connect the two shapes with another curved shape to form the neck.

We'll add the tail in the next step.­

How to Draw Oviraptor in 7 Steps2. Draw the Tail

Draw two curved lines that meet in a point to make the tail. Split the head into two shapes, one thick and one thin, for the upper and lower jaws. Add a rounded triangle on top of the head for the crest.­

Head over to the next page to learn how to draw the legs.

How to Draw Oviraptor in 7 Steps3. Add the Legs

Draw a long oval, slightly bent at the bottom, for the thigh on the near side of the body. Overlap a smaller peanut shape at the end to form the shin, and draw another long, rounded rectangle for the foot. The thigh on the far side of the Oviraptor is hidden, so draw a slightly curved oval for the shin and another long, rounded rectangle for the foot.

You'll learn how to draw the arms and beak on the next page.

How to Draw Oviraptor in 7 Steps4. Add the Beak and Arms

Draw a kidney-bean shape for the upper arm on the near side, and add a bowling-pin shape for the forearm. The upper arm on the far side is hidden, so draw another bowling-pin shape for the forearm on the far side. Add a circle for the eye and a crescent inside the circle for the eyeball. Draw another circle for the ear and a teardrop for the nostril. The Oviraptor has a beak, so draw a shape that's almost like a mitten just above the mouth. Draw a teardrop shape in the mouth to make the tongue, and add details to the rest of the mouth.

Our dinosaur doesn't look mean enough. Let's add the claws. Head over to the next page to find out how.

How to Draw Oviraptor in 7 Steps5. Add the Claws

Make a hook at the end of each arm for a finger and claw. At the side of each finger, draw two more lines that each follow the same shape. These are the back fingers, which are mostly hidden from view. On the hand at the far side, don't forget to add one more smaller hook shape for the thumb. Add three longer spike shapes at the end of each foot for more claws. Be sure to include a fourth claw on the back of the far foot.

Check out the next page to learn how to add muscle and skin details.

How to Draw Oviraptor in 7 Steps6. Add Muscle and Skin Details

Draw in lines to add detail. The lines on the tail, legs, and arms show muscles, while the lines over the rest of the body show skin folds.

We're almost done! Check out the next page to learn how to add the final touches.­

How to Draw Oviraptor in 7 Steps7. Add the Final Touches

Draw over the pencil lines you want to keep with a felt-tip pen. Erase the extra pencil lines, and the dinosaur is ready for you to color.

How to Draw Oviraptor in 7 StepsYour dinosaur is finished! Even if you don't get it right the first time, keep practicing until you're happy with your drawing.

­ The Diplodocus dinosaur's tail is longer than the length of its body. Learn how to draw this dinosaur -- in just five steps.

Saturday, July 9, 2011

How to Draw a Cactus in 7 Steps

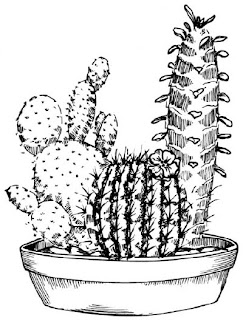
A cac­tus thrives in extremely dry and hot conditions. These unusual plants req­uire very little water to survive and they can live up to 300 years or more, typically in the desert.

A cactus is both an ornamental plant, due to its spiky appearance, and a crop plant. Some believe a cactus great healing powers.

In this section, we'll show you how to draw the above cactus. You can draw this flower freehand while looking at your computer monitor or print out this page to get a closer look at each step.

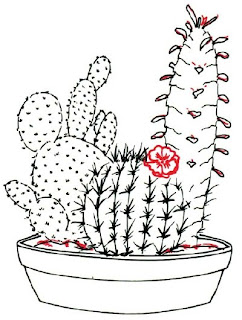
Follow the red lines in each illustration to learn exactly what to draw in that step. The lines drawn in previous steps are shown in gray. Here, we'll show you an illustration of each step and then give you a description of how to draw it.

How to Draw a Cactus in 7 Steps1. Outline

Lightly sketch a curving line for the top of the pot, then sketch two short lines to begin the sides. Lightly sketch an unfinished circle shape for one cactus.

Behind it, sketch an unfinished oval shape for another cactus. Sketch a very long, thin oval for the third cactus.

How to Draw a Cactus in 7 Steps2. Branches

Finish the pot with curving lines. Draw many oval branches on the left-hand cactus. On the center cactus, sketch a circle to show where a flower will go.

How to Draw a Cactus in 7 Steps3. Leaves

Draw leaves on the tall cactus using teardrop and heart shapes. Draw ridges in the center cactus using vertical lines. Put in the ground with a wavy line.

How to Draw a Cactus in 7 Steps4. Spines and Ridges

For spines, draw groups of three short lines all over the left-hand cactus. On the center cactus, draw groups of longer lines along the ridges.

Draw ridges in the right cactus with irregular lines as shown.

How to Draw a Cactus in 7 Steps5. Draw the Pot

Redraw the outlines of the three cacti, making sure the outlines don't go through the ridges. Redraw the pot, adding the edge of the rim.

How to Draw a Cactus in 7 Steps6. Flower Petals

Using the small circle as a guide, draw four flower petals with wavy lines. Draw more petals behind them with additional wavy lines. Draw four tiny circles for the flowers center, then draw short lines on the petals.

Draw in the edges of the leaves on the tall cactus by adding a line to each leaf. Shade the ground with groups of short lines.

How to Draw a Cactus in 7 Steps7. Shading

Shade the center cactus with short lines between the rows of spines, being careful not to shade over the spines. Then shade around the spines with more short lines to give a rounded look.

How to Draw a Cactus in 7 StepsUse short lines to shade the bottoms and sides of the left-hand cactus and its leaves. Use short lines to shade the tall cactus between the ridges. Shade the sides and bottom of the pot.

Guess what? Your flower and plant drawings are complete. Excellent effort! If you're still feeling creative, we have a few special arrangements for you.

Our two final drawings include plant arrangements and flower arrangements. Continue to the next page to learn how to draw a plant arrangement.

Friday, July 8, 2011

How to Draw a Woman in a Pantsuit in 5 Steps

Drawing a person in motion is often more challenging than drawing someone who is standing still. As you draw this walking woman in a pantsuit, you'll capture the sense of free and easy motion in the illustration.In this section, we'll show you how to draw the woman walking in the pantsuit above. Either draw the picture freehand while looking at your computer monitor or print out this page to get a closer look at each step.

Follow the red lines in each illustration to learn exactly what to draw in that step. The lines drawn in previous steps are shown in black. Here, we'll show you an illustration of each step and then give you a description of how to draw it.

How to Draw a Woman in a Pantsuit in 5 Steps1: Sketch the Body

Draw an egg for the head. Divide the egg into uneven left and right halves with a vertical line to determine the center of the face. Separate the egg into upper and lower halves with a horizontal line for the hairline about one-sixth of the way down from the top of the egg. Divide the area below that into three equal parts.

The first line below the hairline is for the eyebrows, and the next line shows the location of the tip of the nose. The ears lie between the eyebrows and the nose. Divide the area below the nose into three more equal parts. The line below the nose is for the mouth opening, and the next line is for the lower lip.

Draw a curved line under the head to show the shape of the neck and backbone. Use rectangles for the chest and hip areas. Draw a curved line between the two rectangles to determine the waist. Form the arms and legs with curved tube shapes.

Sketch oval shapes for the right shoulder, kneecaps, and ankles. Use wedge shapes for the feet. Draw a diamond shape for the left hand and an odd-shaped oval for the right hand.

How to Draw a Woman in a Pantsuit in 5 Steps2: Draw the Hat and Shawl

Draw an oval for the ear. Extend lines above it for the hairline and below it for the neck. Block in the shape of the hat with odd-shaped triangles and ovals.

Sketch the shape of the jacket and slacks with long straight lines. Add the shawl with long straight and curved lines.
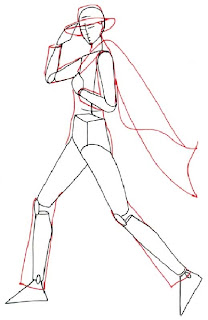
How to Draw a Woman in a Pantsuit in 5 Steps3: Shape the Hair and Jacket

Use long curved lines for the hair and ovals with pointed ends for the eyes. Draw the nose and lips with curved lines as shown. Sketch a very short line at the chin for definition.

Shape the jacket and shawl with long squiggles. Add two pockets to the jacket with rectangles. Form the hands with curved lines. Draw in the shape of the boots with straight lines.

How to Draw a Woman in a Pantsuit in 5 Steps4: Add Details

Finish the eyes with darkened ovals. Sketch a curved line on the hat for the ribbon. Add an E-shaped figure to the left side of the lips for definition.

­Sketch squiggles on the jacket and slacks to show wrinkles. Add a border to the shawl.

How to Draw a Woman in a Pantsuit in 5 Steps5: Add Shading

Finish the hair with squiggles. Add shading to the hat, jacket, and boots. Draw three oval buttons on the bottom of the right jacket sleeve. Finish the shawl with straight lines to define the fringe.

That's it! Even if you didn't get it perfect on the first try, with practice you're sure to succeed. Add to your artistic repertoire by learning how to draw a woman in an oversize sweater, which can be found in the next section.
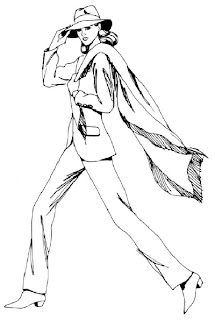
How to Draw a Woman in a Pantsuit in 5 Steps


Tuesday, July 5, 2011

How to Draw a Napping Old Man Cartoon

With a dash of creativity, a pinch of patience and a few easy steps, you have the perfect potion to help you learn how to draw a napping old man cartoon.

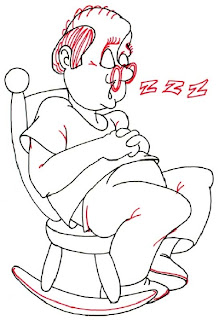
How to Draw a Napping Old Man CartoonIn this section, we'll show you how to draw the above napping old man cartoon. You can draw this sleepy fellow freehand while looking at your computer monitor or print out this page to get a closer look at each step.

Follow the red lines in each illustration to learn exactly what to draw in that step. The lines drawn in previous steps are shown in gray. Here, we'll show you an illustration of each step and then give you a description of how to draw it.

How to Draw a Napping Old Man CartoonStep 1: Draw an oval head and a potato-shaped body. Attach them with two short lines. Use an oval, J-shapes, and curved lines for the legs and feet.

How to Draw a Napping Old Man CartoonStep 2: Form the arms, hands, and shoulders with odd U-shapes. Sketch a circle, straight line, curved line, and banana-shaped, U-shaped, and J-shaped figures for the rocking chair. Use a curved line for the bottom of the pants leg.

Outline an upside-down, thick U-shape for the hair. For the forehead and nose, place a U-shape next to a larger U-shape that has a long curved line attached. Place an upside-down comma-shaped figure under the nose for the mouth. Attach the U-shaped chin to the nose with a curved line.

How to Draw a Napping Old Man CartoonStep 3: Use U-shapes and curved lines to form the forehead, brow, and eyelids. Place attached U-shapes in the ear. Connect U-shapes and curved lines to add fingers.

Outline the clothing with J-shapes (some backward) and curved lines. Form the top of the seat with a J-shape lying on its side. Detail the shoes with curved V-shapes and curved lines.

How to Draw a Napping Old Man CartoonStep 4: Attach short curved lines for the eyebrows. Use two curved lines and a V-shape for wrinkles in the eyelids and face. Draw many curved lines for the hair. Use an oval, partial ovals, and curved lines for the glasses.

Sketch odd Y-shapes and short curved lines for folds in the clothing. Detail the arm with a short curved line and Y-shape. Add soles to the shoes with two curved lines.

Add a long curved line for an edge on the rocking chair base. Show the snoring with three Z-shaped outlines.

How to Draw a Napping Old Man CartoonStep 5: Darken the Z-shapes, glasses, mouth, and inner edges of the clothing. Add shadow lines to the rocking chair, sole of the right shoe, and the leg on your right.