Monday, December 27, 2010

How to Draw a Cartoon Giraffe

Did you know that a giraffe is the world’s tallest living land animal? These super quick creatures are fun to watch for sure, but learning how to draw a cartoon giraffe can be a treat too!

How to Draw a Cartoon Giraffe
Learn how to draw this cartoon giraffe.

In this section, we'll show you how to draw the above cartoon giraffe. You can draw this cartoon giraffe freehand while looking at your computer monitor or print out this page to get a closer look at each step.

Follow the red lines in each illustration to learn exactly what to draw in that step. The lines drawn in previous steps are shown in gray. Here, we'll show you an illustration of each step and then give you a description of how to draw it.

How to Draw a Cartoon Giraffe

Step 1: Start with an oval-shaped body that is drawn at an angle. Attach two upside-down J-shapes for the neck. Use a circle for the head. Form the snout with two straight lines and an oval with one flat side.

How to Draw a Cartoon Giraffe

Step 2: Add circles for the eyes. Sketch a V-shape lying on its side for the nose. Use two ovals (one pointed and one flattened on the bottom) and parallel lines for the horns. Draw a half circle for the chin. Connect a very short curved line to the top of a much longer curved line for the smile.

Form each front leg with a U-shape, two short lines, an oval, two longer lines, and a circle. Place a curved rectangle under each front leg for the hoof. For the rear legs, sketch L-shapes and ovals. Add curved triangles for the hooves.

How to Draw a Cartoon Giraffe

Step 3: Use curved lines, J-shapes, and curved V-shapes for the eyelids, irises, pupils, and nostrils. Form the ears with U-shapes. Place a short curved line between the two horns. Attach small U-shapes to form the mane.

Finish the bottom of the mane with a short curved line. Connect an odd-shaped oval to a long curved V-shape for the tail. Use lines, V-shapes, and L-shapes (all curved) to shape the belly, chest, legs, and hooves.

How to Draw a Cartoon Giraffe

Step 4: Place odd-shaped ovals (some partial) on the body, neck, and head for the spots. Connect the bottoms of five curved lines to show tail hairs. Form hair on the horns using very short lines. Add comma-shaped eyebrows. Draw a curved line in the ear on your left.

How to Draw a Cartoon Giraffe

Step 5: Darken the eyebrows, pupils, nose, and part of each hoof. Use short parallel lines to partially darken the spots.

You did it! Your giraffe is all set and ready to graze. With our next drawing exercise, let your imagination guide you as you draw a very unique "hybrid" Halloween character.

Sunday, December 26, 2010

How to Draw a Cartoon Vampire

Learning how to draw a cartoon vampire doesn’t have to be scary. Cartoon vampires are usually funny, cute, and even friendly!

How to Draw a Cartoon Vampire
Learn how to draw this cartoon vampire.

In this section, we'll show you how to draw the above cartoon vampire. You can draw this cartoon vampire freehand while looking at your computer monitor or print out this page to get a closer look at each step.

Follow the red lines in each illustration to learn exactly what to draw in that step. The lines drawn in previous steps are shown in gray. Here, we'll show you an illustration of each step and then give you a description of how to draw it.

How to Draw a Cartoon Vampire

Step 1: Sketch a circle for the head. Overlap an oval for the cheeks and chin. Draw two curved lines for the body. Show the position of the legs with a horizontal oval that has two U-shapes attached to each end.

How to Draw a Cartoon Vampire

Step 2: Form the hairline with a “figure 3” and a curved line. Use V-shaped ears. Show each eye as a U-shape on a line. Draw a V-shape and a small U-shape for the nose. Outline the mouth with a wavy line above a U-shape.

Shape the cheeks and chin. Sketch the sleeves as tubes. Place a backward J-shape in the end of one sleeve. Attach circles for the hands. The bottom of the jacket is a curve with ends that angle back. Outline the potato-shaped feet.

How to Draw a Cartoon Vampire

Step 3: Draw diagonal, comma-shaped eyelids. Detail each eye with a circle and curves. Add lines under the nose and by the mouth. Form the tongue with a check mark. Shape the sleeve on your right. Draw hands and fingers with U-shapes, J-shapes, and curves.

Outline the cape with a U-shape and J-shape. Place lines at the shoulders. Form the jacket with a Y-shape. Finish the pants with lines and straps over the shoes. Shape the shoes and heels.

How to Draw a Cartoon Vampire
Step 4: Add S-shaped and comma-shaped eyebrows. Place curves in the ears. Sketch U-shaped fangs. For the bow tie, draw a circle, rounded rectangles, and teardrop-shaped loops. Shape the bow. Form the buttons with circles.

Draw three lines for the pocket. Finish the cape with triangles and long lines. Place V-shapes behind the knees. Show the jacket’s tail as two V-shapes. Put buckles on the shoes using rectangles. Shape the curved soles.

How to Draw a Cartoon Vampire

Step 5: Darken all of each pupil except for the tiny circle drawn previously. Also darken inside the mouth, the loops of the bow, and the shoe buckles.

Fill most of the eyebrows and hair with lines to darken them. Shade the inside of the cape with diagonal lines.

That wasn’t scary at all. Great job! Let’s move on to one of the most thrilling vehicles on the planet.

Saturday, December 25, 2010

How to Draw a Cartoon Monster Truck

The monster truck is famous for crushing smaller vehicles under its massive wheels -- and they’re pretty cool looking too. Once you learn how to draw a cartoon monster truck, you can move on to drawing monster truck tricks and maybe even an entire monster truck show!

How to Draw a Cartoon Monster Truck
Learn how to draw this cartoon monster truck.

In this section, we'll show you how to draw the above cartoon monster truck. You can draw this cartoon monster truck freehand while looking at your computer monitor or print out this page to get a closer look at each step.

Follow the red lines in each illustration to learn exactly what to draw in that step. The lines drawn in previous steps are shown in gray. Here, we'll show you an illustration of each step and then give you a description of how to draw it.

How to Draw a Cartoon Monster Truck

Step 1: Start with two large slanted rectangles drawn side by side. Then place two smaller slanted rectangles on top.

How to Draw a Cartoon Monster Truck

Step 2: Draw two ovals (one small and one large) for the tires. Add a third partial oval for the wheel on your right. Form each axle with two curved parallel lines.

Connect the two lines in the front axle with a short curved line. Sketch odd-shaped squares for the headlights. Add small circles and two pointed ovals for the roof lights.

How to Draw a Cartoon Monster Truck

Step 3: Use a diamond, triangle, and rectangle for windows. Put a long U-shape under the windshield and a curve around it. Form oval headlights and a banana-shaped bumper. For the front axle’s differential housing, draw a U-shape with a curve and rectangle on opposite ends.

Use curves for the rear housing. Place a banana-shaped figure above it. Sketch a U-shaped front wheel well; make a question mark for the rear one. Attach a curved rear bumper.

How to Draw a Cartoon Monster Truck

Step 4: Form eyes in the headlights using four U-shapes. Add U-shapes to the front hood and roof lights. Also draw U-shapes in the tires on the passenger’s side and above the wheel wells.

Place two straight lines along the side of the truck. Sketch a slightly curved line in the wheel on your right. Form the front grille with parallel lines. Use comma-shaped bumper guards so they look like fangs.

How to Draw a Cartoon Monster Truck

Step 5: Darken the inner wheel wells and the headlights’ pupils. Use short lines to shade the tires, axles, front grille, bumper, bumper guards, and roof lights.

Fill most of the eyebrows and hair with lines to darken them. Shade the inside of the cape with diagonal lines.

Now that your monster truck is ready to roll, let's move on to a character that has been portrayed as fun and friendly, but also mighty and mischievous.

Sunday, December 19, 2010

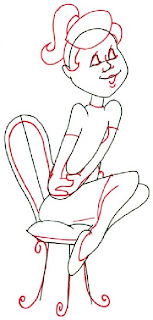
How to Draw a Cartoon Girl

Learning how to draw an adorable cartoon girl can be easy with our detailed directions and easy to follow illustrations. With a little creativity, see how fun it can be to bring a cartoon girl to life.

How to Draw a Cartoon GirlIn this section, we'll show you how to draw the above cartoon girl. You can draw this cartoon girl freehand while looking at your computer monitor or print out this page to get a closer look at each step.

Follow the red lines in each illustration to learn exactly what to draw in that step. The lines drawn in previous steps are shown in gray. Here, we'll show you an illustration of each step and then give you a description of how to draw it.

How to Draw a Cartoon GirlStep 1: Sketch a roughly heart-shaped figure for the head. Use an oval for the body. Show the neck as two short lines. Draw an oval at an angle for the top part of the legs.

Form the foot with a smaller oval. Connect it to the knees with a very short straight line and a much longer one.

How to Draw a Cartoon GirlStep 2: Draw upside-down U-shapes and a straight line under them for the eyes. Show the nose as a J-shape with a straight line under it. Form the mouth with a broad curve and two short lines at the ends. Use a C-shape for the ear.

Start to draw the arms with a U-shape. Draw another U-shape around it, and curve the tops for the shoulders. Show the back of the chair as an upside-down U-shape with a line through the middle.

Draw the cushion with curved and straight lines. Use straight lines to start the chair legs. Form a second leg with a J-shape. Shape her first leg with a curved line.

How to Draw a Cartoon GirlStep 3: Sketch the hair with a pointed oval shape and two comma-shaped figures. Form a comma-shaped figure above the oval. Add an S-shaped ponytail. Draw slanted triangles and curved lines for the closed eyes. Use a J-shape and two small curved lines for the nose.

Form the mouth with a J-shape and two curved lines. Outline the dress with curved lines at the neck, arms, bust, and above the knee. Shape the hands with curved V-shapes and lines. Show the leg’s outline with a curved line.

Attach a backward J-shape for the shoe top. Add a second U-shape to the chair back. Show the chair seat with a straight line. Give the chair legs curled-up ends.

How to Draw a Cartoon GirlStep 4: Add texture to the hair with many curved lines. Draw comma-shaped eyebrows. Place a tiny curlicue in the ear. Use a small circle for the earring. Give the dress a collar and cuffs by attaching many small U-shapes. Show folds in the dress with some curved lines.

Draw two J-shapes for more fingers. Add another shoe with a backward J-shape and three lines for the heel. Draw U-shapes and a long oval for the chair rungs. Make the cushion look plump with three short curved lines.

For the chair back, use the centerline as a guide. Form an upper scroll and two side scrolls. Place a small circle above the upper scroll.

How to Draw a Cartoon GirlStep 5: Darken the hair band and eyebrows. Give dimension to the legs and back of the chair by thickening the scrolled lines. Shade the chair with short lines.

There, your pretty cartoon girl is complete. Excellent effort. Your skills are getting better and better with each drawing, so now it's time to stretch your ability a bit further.

Saturday, December 11, 2010

How to Draw a Cartoon Dragon

Although it may look complicated, learning how to draw a cartoon dragon is simple and fun. Once you’ve mastered drawing a cartoon dragon, you can sketch these cute, cuddly creatures cruising through the sky, perched on a mountaintop, or lounging near a lagoon.

How to Draw a Cartoon Dragon
Learn how to draw this cartoon dragon.

In this section, we'll show you how to draw the above cartoon dragon. You can draw this friendly dragon freehand while looking at your computer monitor or print out this page to get a closer look at each step.

Follow the red lines in each illustration to learn exactly what to draw in that step. The lines drawn in previous steps are shown in gray. Here, we'll show you an illustration of each step and then give you a description of how to draw it.

How to Draw a Cartoon Dragon

Step 1: Draw a large pear-shaped body. Sketch an oval for the snout. Above it, add a partial circle for the head. Use two ovals to show the hands.

Draw two long ovals for the feet. Sketch four curved lines for the legs. Add the comma-shaped tail.

How to Draw a Cartoon Dragon

Step 2: Use ovals (some partial) for the fingers and toes. To show part of the arms, use a U-shape and long J-shape (both upside-down). Attach a short line to one thumb.

Draw an oval and two short curved lines for the mouth. For the nose, use two partial circles and two J-shapes lying on their sides. Add upside-down V-shaped ears. Form U-shaped brow lines.

How to Draw a Cartoon Dragon

Step 3: Sketch partial circles for the eyes. Draw the curved inner ear lines. Use comma-shaped eyebrows. Create teardrop-shaped nostrils. Outline the bottom and the left and right sides of the jaw with short curved lines.

Form two long curved lines down the belly and along the tail. Add claws using thick comma-shaped figures and curved V-shapes. Finish the forefinger on your left with a short line.

To draw a cartoon dragon, add check marks for eyelids. Draw pupils, irises, U-shaped teeth, scales, and the knees.

Step 4: For eyelids, use two check marks. Draw pupils and irises using four lines. Connect U-shapes along the back of the head. Place a curve under these fins. Draw U-shaped teeth.

Form J-shaped, U-shaped, and W-shaped scales. Draw lines along the belly and tail. Connect the tail to the leg on your right with a line. Use two squiggly lines for the knees.

To finish drawing a cartoon dragon, darken the pupils, eyebrows, and nostrils. Add shadow lines to the cartoon dragon’s palms.

Step 5: Darken the pupils, eyebrows, and nostrils. Add shadow lines to the palms of the hands.

Your dragon looks like he's ready to fly. And handsome too! By now you should be a bit more confident with your drawing skills.

Monday, December 6, 2010

How to Draw a Cartoon Dog

If you want to learn how to draw a cartoon dog, it’s easier than you might think. Follow the step-by-step instructions below and you will have the perfect picture of a playful pooch to hang on the wall or show to your friends.

To draw a cartoon dog, examine the illustration of a cartoon dog before proceeding to step 1.
Learn how to draw this cartoon dog.

In this section, we'll show you how to draw the above cartoon dog. You can draw this cartoon dog freehand while looking at your computer monitor or print out this page to get a closer look at each step.

Follow the red lines in each illustration to learn exactly what to draw in that step. The lines drawn in previous steps are shown in gray. Here, we'll show you an illustration of each step and then give you a description of how to draw it.

To draw a cartoon dog, start by drawing ovals for the head and snout. Draw a potato-shaped body.

Step 1: Draw two ovals for the head and snout. Sketch a potato-shaped body. Use two short lines for the neck.

When drawing a cartoon dog, sketch the shapes that will represent the eyes, nose, ears, legs, and tail.

Step 2: Attach upside-down U-shapes to a curved line for the eyes. Use a rounded triangle for the nose. Add two curved tubes (one without one end) for the ears. Use a large J-shape for the front leg on your left.

Sketch an odd-shaped oval and three nearly straight lines for the front leg on your right. Use an oval, two straight lines, and a large J-shape for the back leg. Make the tail look like the top part of a question mark.

When drawing a cartoon dog, complete the face and draw the collar, paws, back, and chest.

Step 3: Sketch the pupils, irises, and eyelids with J-shapes and short curved lines. Form the nostrils with a Y-shape connected to thin small ovals and a curved line. Create the mouth with two parallel J-shapes.

Use a curved line in a squared U-shape for the collar. Draw U-shapes, V-shapes, and a curved Y-shape for the paws. Shape the back and chest with a U-shape and odd Y-shapes.

When drawing a cartoon dog, draw the eyebrows, whiskers, and hair. Detail the ears and draw the elbows and tongue.

Step 4: Add comma-shaped eyebrows. Use short curved lines for whiskers and hairs on the head. Detail the ears with two short lines and a backward Y-shape. Sketch the tongue as a U-shape with a curved line in it.

Place a small comma-shaped figure at the end of the mouth. Attach curved V-shapes to reshape the tail. Draw a long curved line along the back. Use two check marks for elbows.

To finish drawing a cartoon dog, darken the facial features. Shade the collar. Show the tail wagging with curved lines.
Step 5: Darken the eyebrows, pupils, mouth, and nostrils. Shade the collar with short straight lines. Add short curved lines to show the tail wagging.

Perfect -- your playful cartoon dog is complete! Are you ready to practice drawing another friendly face?


Wednesday, December 1, 2010

Cooking Cartoon Series

Cooking Cartoons Featuring The Humor of The Reluctant Gourmet

I thought it would be fun to create these cooking cartoons with the Reluctant Gourmet character finding himself in many of the same situations any stay-at-home dad might experience.

Cooking Cartoon Series

Cooking Cartoon Series

Cooking Cartoon Series