Thursday, December 29, 2011

How to Draw World War II Planes in 7 Steps

Draw dogfights in the s­kies with our World War II plane. The step-by-step instructions below make it easy.

In this section, we'll show you how to draw the above World War II plane. Either draw it freehand while looking at your computer monitor or print out this page to get a closer look at each step.

­Follow the red lines in each illustration to learn exactly what to draw in that step. The lines drawn in previous steps are shown in gray. Here, we'll show you an illustration of each step and then give you a description of how to draw it.

Ready to get started? Head over to the next page for the first step.

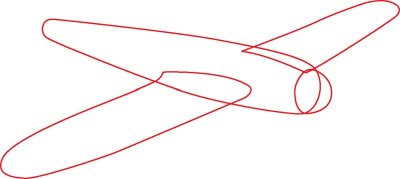
How to Draw World War II Planes in 7 Steps1. Draw the Body and Wings

Draw a long oval for the body of the plane. Add an oval at the front to make the forward bubble window. Sketch the two long wing shapes.

Check out the next page and find out how to draw the tail.

How to Draw World War II Planes in 7 Steps2. Add the Tail and Cockpit

­Draw three rounded triangles for the tail. Add a long wedge shape on top of the body for the cockpit.

How is a plane supposed to fly without an engine? We'll take care of that problem on the next page.

How to Draw World War II Planes in 7 Steps3. Draw the Engines

Sketch two cylinders on each wing to make the engines. Add a circle at the tip of each cylinder. Draw a curved line near the front of each engine to add detail.

In the next step, we'll draw the propellers.

How to Draw World War II Planes in 7 Steps4. Draw the Propellers

Draw a cone in the center of each engine, and add three long, thin ovals coming from each cone to form the propellers. Add a slanted detail line to the tip of each propeller.

We'll work on drawing the cockpit windows on the next page.

How to Draw World War II Planes in 7 Steps5. Add the Cockpit Windows

­Draw windows on the cockpit. Sketch body details in front of the windows. Finish with a long rectangle, circle, and star emblem on the far wing.

We'll work on adding detail to the body in the next section.

How to Draw World War II Planes in 7 Steps6. Add Detail to the Body

­Add rectangles to the bottom two tail sections. Fill the rectangles in with lines. Draw a rectangle with a corner missing on the top tail section, and add a smaller rectangle inside it. Sketch line details on the wings, engines, and cockpit. Finish with a couple rectangles for hatches on the body side and some details on the front bubble window.

We're almost done! We'll add the final touches on the next page.

How to Draw World War II Planes in 7 Steps7. Add the Final Details

­Trace the pencil lines you want to keep with a felt-tip pen. Erase any extra lines.

How to Draw World War II Planes in 7 StepsAnd your World War II plan is finished. You can add more elements -- such as clouds -- to your drawings to make them more exciting.

Wednesday, December 14, 2011

How to Draw a Cat in 5 Steps

Prac­tice drawing this cool ca­t to purr-fect your drawing skills.

In this sec­tion, we'll show you how to draw the above cat. Either draw it freehand while looking at your computer monitor or print out this page to get a closer look at each step.

Follow the red lines in each illustration to learn exactly what to draw in that step. The lines drawn in previous steps are shown in gray.

We'll show you an illustration of each step and then give you a description of how to draw it.

Cat Image Gallery

1. Draw the Body

Draw an upside-down pear shape for the body, and add the head shape.


2. Add Ears

Sketch two football shapes for the l­egs. Add two rounded triangles for the ears.

Next you'll add the tail to the cat, along with its set of paws.


3. Add a Tail

Draw a curved shape for the tail. Put in short ovals for t­he front paws and curved rectangles for the back paws.

A few final details will give your cat some personality. Learn how to draw a cat's fact on the next page.


4. Draw Eyes, Nose and Toes

Draw ovals for the eyes, and add smaller ones for the pupils. Sketch a triangle for the nose with curved lines underneath it for the mouth.

Put smaller triangles inside the ear shapes. Add curved lines for eyebrows and eyelashes and details on the toes, hair, legs, and whiskers.


5. Trace the Lines

Trace the pencil lines you want to keep with a f­elt-tip pen, and erase any extra lines.

Now your cat drawing is complete and ready to color!

Cats might not come to mind when you think of Australia, but kangaroos most likely do. Next we'll show you how to draw a kangaroo.

Friday, November 11, 2011

How to Draw an Iris in 5 Steps

Much like a poppy, an iris is a showy flower. It is grown as an orna­mental plant in gard­ens, and colors range from purple and sky-blue to yellow and a rare red.

In this section, we'll show you how to draw the above iris. You can draw this flower freehand while looking at your computer monitor or print out this page to get a closer look at each step.

Follow the red lines in each illustration to learn exactly what to draw in that step. The lines drawn in previous steps are shown in gray. Here, we'll show you an illustration of each step and then give you a description of how to draw it.

How to Draw an Iris in 5 Steps1. Sketch the Petals

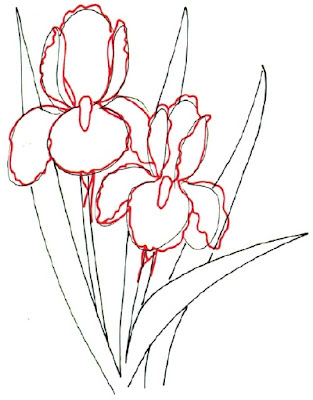
Lightly sketch an oval shape for the top of the flower. Underneath it, sketch a circle. For the second iris, sketch another oval and circle to the right and a little below the first set.

To make petals, sketch a sausage-shaped loop on both sides of the ovals. Sketch half-circles on both sides of the circles.

How to Draw an Iris in 5 Steps2. Add Leaves

Add stems to the flowers by drawing two slightly curving lines coming down from each flower. Draw three long, narrow leaves behind the flowers.

Make sure the leaf lines don't go into the petals of the flowers. Draw another leaf curving below the two flowers.

How to Draw an Iris in 5 Steps3. Outline the Blossoms

Give the flowers ruffled edges with wavy lines along the petal edges. Draw a rough, long oval in the center of each flower. Add a fold at the top of each stem by drawing two vertical lines to make the top of the stem wider.

Then draw a diagonal line across the stem. Draw a second diagonal line from the top of the stem to the center of the first line.

How to Draw an Iris in 5 Steps4. Finish the Petals

S­ketch many short lines all around the centers of the flowers to make them look fuzzy. On the lower petals of each flower, sketch in a wavy line as shown. Draw many tiny circles on both sides of the line.

Draw a series of parallel lines in the top area of each stem above the fold you drew in step 3. In the bottom leaf, draw the fold of the leaf with a long line through the center, following the curve of the leaf.

How to Draw an Iris in 5 Steps5. Details and Shading

A­dd short, curving lines to the petals for shading. Vary the lengths of the lines. Use short lines to add shading on one side of each of the centers.

For the stems, draw in several long lines at the bottom and a few short lines at the top. Draw a series of long, vertical lines in each leaf, following the curve of the leaf.

How to Draw an Iris in 5 StepsYour iris drawing is complete! Ready for another? Continue to the next section to learn how to draw a flaming red plant that some like to call "winter rose."

Sunday, October 23, 2011

How to Draw a Violet in 5 Steps

The viole­t has a whopping 400-5­00 species throughout the world and it is popular for its many delightful scents. This flowering plant is the color of violet, of course, but it can also be blue, yellow, white or even a combination of yellow and white.

In this section, we'll show you how to draw the above violet. You can draw this flower freehand while looking at your computer monitor or print out this page to get a closer look at each step.

Follow the red lines in each illustration to learn exactly what to draw in that step. The lines drawn in previous steps are shown in gray. Here, we'll show you an illustration of each step and then give you a description of how to draw it.

How to Draw a Violet in 5 Steps1. Rough Outline

Lightly sketch four circles to show the position of the flowers. Lightly sketch two heart shapes below them for leaves. Sketch curving lines for the stems.

Behind the flowers, sketch three more leaf shapes using curved lines.

How to Draw a Violet in 5 Steps2. Sketch Petals and Leaves

Within the circles, sketch petals using circular shapes. Outline the leaves with scalloped lines. For the leaves behind the flowers, show that they are folded over.

Do this by drawing one side of the shape with a curving line. Draw a second, scalloped line inside the shape.

How to Draw a Violet in 5 Steps3. Stems and Scallops

Draw the outlines of the petals with slightly scalloped lines. Draw two short, curving lines in each petal to show ridges. Draw in the stems.

Add a scalloped line at the bottom of the stems. Draw a small arc below the scalloped line.

How to Draw a Violet in 5 Steps4. Veins

Draw in the veins of the bottom leaves using double branched lines. In the leaves that are folded, the center vein can't be seen.

Draw narrow V shapes that curve toward the scalloped edges. Draw tiny circles for the centers of the flowers.

How to Draw a Violet in 5 Steps5. Shading and Detail

Shade the leaves with short parallel lines on either side of the veins. Shade the edges of the leaves with very short lines.

How to Draw a Violet in 5 StepsUse just a few short lines to shade each of the petals at the tips, Shade the centers of the flowers with a few very short lines.


Saturday, October 8, 2011

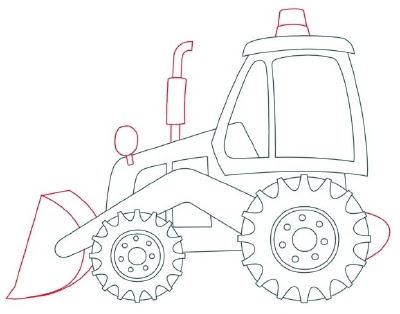
How to Draw Backhoes in 11 Steps

The backhoe is a versatile machine -- it can dig and scoop with its buckets on the front and back. The large bucket on this construction vehicle is attached to the end of an arm. Some say the arm looks like a giant human arm.

In this section, we'll show you how to draw the above backhoe. You can draw this construction vehicle freehand while looking at your computer monitor or print out this page to get a closer look at each step.

Follow the red lines in each illustration to learn exactly what to draw in that step. The lines drawn in previous steps are shown in gray. Here, we'll show you an illustration of each step and then give you a description of how to draw it.

Head over to the next page for the first step.

How to Draw Backhoes in 11 Steps1. Draw the Wheels

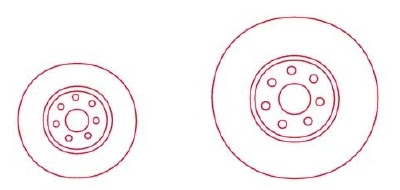
Begin by drawing the wheels, which are made up of many circles.

On the next page we'll draw the treads.

How to Draw Backhoes in 11 Steps2. Add the Treads to the Tires

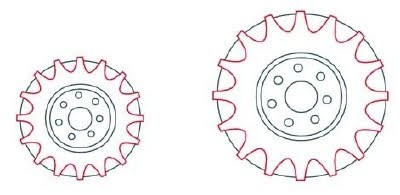
To add tread to the tires, draw a star burst shape around each of the outside circles. This is fun to do!

On the next step we'll draw the body.

How to Draw Backhoes in 11 Steps3. Draw the Body

Draw the shape that makes up the body of the backhoe. Draw two rectangles inside the front of this shape. Be sure to round the one corner as shown.

Up next, we'll draw the cab.

How to Draw Backhoes in 11 Steps4. Draw the Cab

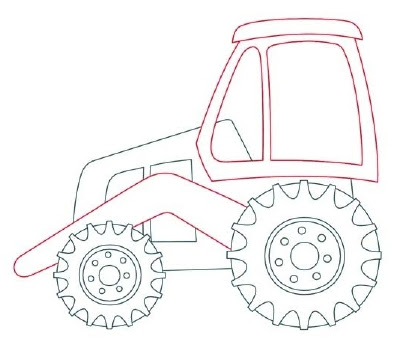
Draw the cab; notice how the top is narrower than the bottom. Draw the windows in the cab. Draw the roof. On the side, draw a boomerang shape from the back wheel to past the front wheel.

Next, we'll draw the safety light and exhaust pipe.

How to Draw Backhoes in 11 Steps5. Draw the Light and Exhaust Pipe

­Draw the safety light on the cab roof, and draw the back of the headlight at the front of the hood. On the hood, draw the muffler, which is a rectangle with a pipe running through it.

For the front bucket, draw a half-circle, adding a point that juts out at the bottom. Outline the bucket to add depth. At the rear, draw a small bump behind the tire.

We'll add some detail to our backhoe on the next page.

How to Draw Backhoes in 11 Steps6. Add Detail to the Cab

Draw all the details on the far side of the backhoe that are visible from this side, including the other headlight, the windows on the other side of the cab, and the edge of the front tire on the far side.

Up next, we'll draw the boom.

How to Draw Backhoes in 11 Steps7. Draw the Boom

­Draw the arm for the backhoe scoop. It is made up of two curved rectangular shapes with rounded ends. Outline each rectangle for depth.

Draw the rounded triangular shape near the top of the lower arm.

Next, we'll draw the seat and steering wheel.­

How to Draw Backhoes in 11 Steps8. Draw the Seat and Steering Wheel

Draw the steering wheel and driver's seat inside the cab. Add detail lines for depth.

We'll add the scoop on the next page.

How to Draw Backhoes in 11 Steps9. Add the Scoop

Draw the backhoe scoop. Look at the example to see how it attaches to the boom.

We'll draw the hydraulics on the next page.

How to Draw Backhoes in 11 Steps10. Draw the Hydraulics

Add circles for the pivot points that move the arms up and down. Outline the circles where indicated to add depth. To finish your backhoe, draw two hydraulic cylinders.

On the next page, we'll finish our drawing.

How to Draw Backhoes in 11 Steps11. Add the Final Touches

­Use a felt-tip pen to trace over the lines you want to keep, and erase the extra pencil lines.

How to Draw Backhoes in 11 StepsDrawing the backhoe was great fun, huh? Even more fun is drawing every kid's favorite construction vehicle -- the popular dump truck.


Thursday, September 29, 2011

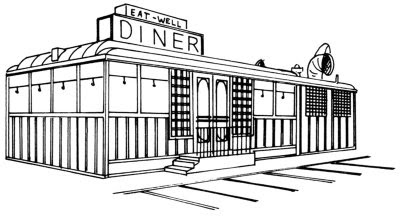
How to Draw Diners in 5 Steps

Th­is ­diner promises good times an­d good food. Every detail of this building -- from­ the windows to the signage -- brings to mind the classic diners of the 1950s.

In this section, we'll show you how to draw this diner. You can draw it freehand while looking at your computer monitor, or you can print out this page to get a closer look at each step.

Here, we'll show you an illustration of each step and then give you a description of how to draw it. Follow the red lines in each illustration to learn exactly what to draw in that step. The lines drawn in previous steps are shown in gray.

How to Draw Diners in 5 Steps1. Perspective Lines

Use the exercise on perspective and vanishing points to establish the basic shape of the diner.

How to Draw Diners in 5 Steps2. Sketch the Structure

Sketch the shape of the windows, door, and side details using the rules on drawing lines that are parallel to the basic structure found in the introductory exercise. Add curl­y details to the roof as shown.

How to Draw Diners in 5 Steps3. Stairs and Door

Establish the sign over the diner and the stairs using the rules on vanishing points.

Draw the shape of the stairs using three lines that meet at the right-hand side. Add steps with straight lines. Separate the windows with straight single and double lines. Draw two rectangles for the glass in the door. Add odd-shaped figures for the pipes on the roof as shown.

How to Draw Diners in 5 Steps4. Sign and Decor

Print the name of the diner on the sign. Detail the roof with four curved lines and odd-shaped figures. Draw horizontal lines in the windows for the shades. Add a short vertical line ending in a blackened circle underneath. Detail the side and front with double lines.

Draw curves at the top and bottom of the door and two horizontal lines in the middle. Use straight vertical and horizontal lines for the banister. Add a line parallel with the bottom of the front of the building for the parking lot. Extend parallel straight lines for the parking spaces.

How to Draw Diners in 5 Steps5. Details

Shade the pipes on the roof with diagonal lines. Add grillwork to the windows with intersecting vertical and horizontal lines. Finish the banister with vertical lines. Add blackened lines to the sign and parking spots for shading.

How to Draw Diners in 5 StepsYour drawing is finished! Even if you don't get it right the first time, keep practicing until you're happy with your drawing.


Monday, September 19, 2011

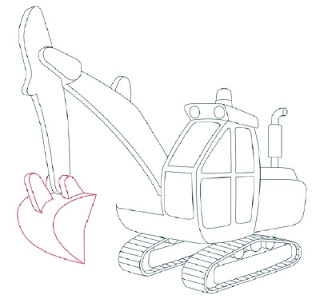
How to Draw Excavators in 11 Steps

Though it may look like a creature from outer space, this versatile construction vehicle is useful for everything from demolition and digging up dirt to open-pit mining and placing pipes.

In this article, we'll show you how to draw the above excavator. You can draw this construction vehicle freehand while looking at your ­computer monitor or print out this page to get a closer look at each step. Follow the red lines in each illustration to learn exactly what to draw in that step. The lines drawn in previous steps are shown in gray. Here, we'll show you an illustration of each step and then give you a description of how to draw it.

Are you ready to get started drawing this amazing machine? Head over to the next page for the first step.

How to Draw Excavators in 11 Steps1. Draw the Body Outline

Draw the shapes that make up the excavator's cab and platform.

On the next page, we'll draw the windows.

How to Draw Excavators in 11 Steps2. Draw the Windows

Add windows on the cab. There are two in front of the cab and four on the side. Add a roof by drawing two rounded rectangular shapes side by side.

On the next page, we'll learn how to draw the exhaust pipe.

How to Draw Excavators in 11 Steps3. Add the Light and Muffler

Draw two circles on the front of the roof and a safety light on top. Draw a muffler, which is oblong with a curved pipe running through it. Draw a circle at the end of the pipe.

We'll begin drawing the tracks on the next page.

How to Draw Excavators in 11 Steps4. Draw the Track

To draw the track, start with a rounded triangle. Draw another triangle just inside the first one. Inside the triangle, draw a rectangle and add part of a circle at each end. Draw three more circles above the rectangle, adding lines for depth.

On the next page, we'll continue drawing the tracks.

How to Draw Excavators in 11 Steps5. Add the Treads

Draw the track on the far side, where only some of the parts can be seen. Finish the tracks by using a ruler to draw evenly spaced lines around the outside of each one for tread.

Up next, we'll draw the boom for the shovel.

How to Draw Excavators in 11 Steps6. Add the Boom

To draw the arm of the boom, draw a long rectangle with a slight boomerang bend. Just above the bend, draw a rounded triangle. At the top of the boom, draw a long oval shape. Outline all parts of the boom arm to add depth.

We'll continue work on the boom on the next page.

How to Draw Excavators in 11 Steps7. Draw the Lower Boom

Draw the shape that makes up the bottom of the boom -- a long, skinny oval with a bump on one side. Outline it to add depth.

On the next page, we'll draw the bucket.

How to Draw Excavators in 11 Steps8. Draw the Bucket

To draw the bucket, draw a crescent shape and connect the tips with an almost-straight line. On top of the bucket, draw two rounded triangles; outline them to add depth. Add lines to create the triangle behind the bottom of the boom.

We'll work on the hydraulics on the next page.

How to Draw Excavators in 11 Steps9. Add the Hydraulics

Add circles for the pivot joints, which allow the boom and bucket to move up and down. Outline each circle for depth. Draw the two hydraulic cylinders using long rectangles and cylinders.

Up next, we'll add the boom hydraulics.

How to Draw Excavators in 11 Steps10. Add the Boom Hydraulics

Draw the two hydraulic cylinders that attach the boom to the body of the cab. Draw the line behind the cylinders to complete the platform.

We're almost done! We'll finish up on the next page.

How to Draw Excavators in 11 Steps11. Finish the Drawing

Use a felt-tip pen to trace over the lines you want to keep, and erase the extra pencil lines.

How to Draw Excavators in 11 StepsAll done, but there's just one problem. Once the excavator scoops all of the materials up and out, what on earth will they use to move it all? You guessed it -- a bulldozer!