Thursday, June 30, 2011

How to Draw a Baseball Pitcher's Windup Cartoon

Want to learn how to draw and pitch at the same time? If you follow our step-by-step instructions below, you’ll learn how to draw a familiar scene from America’s favorite pastime. Learn how to draw a baseball pitcher’s windup cartoon!

How to Draw a Baseball Pitcher's Windup CartoonIn this section, we'll show you how to draw the above baseball pitcher’s windup cartoon. You can draw this cartoon freehand while looking at your computer monitor or print out this page to get a closer look at each step.

Follow the red lines in each illustration to learn exactly what to draw in that step. The lines drawn in previous steps are shown in gray. Here, we'll show you an illustration of each step and then give you a description of how to draw it.

How to Draw a Baseball Pitcher's Windup CartoonStep 1: Start with a large rounded triangle to show the position of the legs. Above it, sketch a pointed oval for the body. Draw a rounded heart-shaped head. Add a vertical oval shape for an arm.

Attach it to the body with two lines. Form a pointed oval around one end of the arm for the mitt. For the raised leg, draw a rounded V-shape and a pointed oval.

Show the other leg as an oval. Below it, draw a rounded triangle for the foot. Use two short lines for the ankle.

How to Draw a Baseball Pitcher's Windup CartoonStep 2: Add a curved line and a U-shape for the ears. Show the eyes as half circles with diagonal lines through them. Use a circle connected to a small oval and a half circle for the nose.

Draw the mouth as a broad curve. Define both sides of the chin with two short curves. Show the cuff of the glove as a comma-shaped figure.

Redraw the uniform with curved lines. Finish the legs by drawing a curved Y-shape. Outline the shoes with attached curved lines.

How to Draw a Baseball Pitcher's Windup CartoonStep 3: Form the pillow-shaped cap, adding two short curved lines to the lower end on your right. Show the underside of the visor as an oval. Shape the hair like a paddle.

Place a curved V-shape behind the ear for more hair. Put a curlicue in the ear. Use S-shapes for the eyes and eyebrows. Add curved smile lines, and draw two short curved lines under the nostrils.

Form the lower lip with a curved line. Shape the mitt’s fingers with curved lines and an upside-down U-shape. Draw a curved L-shape and J-shape for the sleeve.

Show the folds in the uniform with curved lines around the knees and waistband. Draw the stirrups on the pants as curved lines. Detail each shoe with curved and straight lines.

How to Draw a Baseball Pitcher's Windup CartoonStep 4: Place two curved lines around the cap’s rim. Finish the visor with two curved lines. Show a cowlick by the hat using three curved lines. Draw ovals between the mitt’s fingers.

Use a five-sided figure drawn in double lines for the patch. Draw a lightning bolt inside it. Form the other arm with a line from the cheek to the mitt. Put stripes on the sleeve, shirt, and pants legs using curved double lines.

Detail the shoes with ovals and curved lines. Add cleats with attached U-shapes and lines around the soles. Use a curved line with jagged parts for the pitcher’s mound. Draw a few jagged lines for grass. Crisscross curved lines near the mitt, back, and raised foot to show movement.

How to Draw a Baseball Pitcher's Windup CartoonStep 5: Darken the irises and the visor’s underside. Use evenly spaced lines to partially darken the stripes. Shade the cap and mitt with curved lines.

So how's your windup now? I'm guessing, just as good as your drawing skills!

Well, it looks like your creative journey is almost over, so it's only fitting that our final drawing is a character at rest.

Sunday, June 26, 2011

How to Draw a Cartoon Roller-Skater

Drawing a cartoon roller-skater can be challenging, but it can also be rewarding. Once you learn how to draw a cartoon roller-skater, you’ll have the art skills you need to draw a cartoon biker, a cartoon ice-skater, and many other crazy characters on wheels.

How to Draw a Cartoon Roller-SkaterIn this section, we'll show you how to draw the above cartoon roller-skater. You can draw this cartoon roller-skater freehand while looking at your computer monitor or print out this page to get a closer look at each step.

Follow the red lines in each illustration to learn exactly what to draw in that step. The lines drawn in previous steps are shown in gray. Here, we'll show you an illustration of each step and then give you a description of how to draw it.

How to Draw a Cartoon Roller-SkaterStep 1: Sketch a peanut-shaped body. Use a heart-shaped figure on its side for the head. Draw two short lines for the neck. To show the leg bent under the body, use a long U-shape attached to an oval by a short straight line.

Connect the leg to an oval foot with two straight lines. Form two long U-shapes for the leg bent back. Overlap an oval for the other foot.

How to Draw a Cartoon Roller-SkaterStep 2: Draw headphones with curves and a partial circle. Place a curve and V-shapes around the headphones. Use a curved ear pad on your left. For an eyebrow and nose, form a question mark.

Use curves and U-shapes for the nostril, mouth, and eyes. Draw curves for shoulders and arms. Add oval hands. Define the clothes with U-shapes and lines. Connect curves for each boot top. In the lower boot, draw a Y-shape.

How to Draw a Cartoon Roller-SkaterStep 3: Texture the hair with curves. Add comma-shaped eyebrows, curved V-shaped eyelids, and teardrop-shaped eyelashes. Extend the mouth and cheeks with Y-shapes. Add curves for the teeth, tongue, and lip.

Draw a U-shaped collar. Form the sleeves with lines and ovals. Outline the arms and fingers with curves and V-shapes. Add folds to the boots with short lines. Draw the skates with ovals, U-shapes, and straight lines.

How to Draw a Cartoon Roller-SkaterStep 4: Shape the headphones with curves. Place an oval in one ear pad and a curve in the other. Draw musical notes. Form the receiver’s cord as a curved tube. Show the receiver as a rounded square and oval.

Put a circle and rectangle on it. Draw a curlicue on one elbow. Use curved lines for folds in the shirt and wrinkles and a stripe in the shorts. Crisscross curves near the head and feet to show movement.

How to Draw a Cartoon Roller-SkaterStep 5: Darken the eyebrows, eyelashes, insides of the sleeves, and notes. Use short lines to shade the receiver, headphones, boots, and stripe on the shorts.

If you liked drawing a cartoon roller-skater, you’ll love drawing our next energetic athlete.

Thursday, June 23, 2011

How to Draw a Cartoon Juggler

Jugglers are lots of fun to watch. Wouldn't it be great if you could learn how to draw these wacky characters in action in a few simple steps? You can!

Learning how to draw a cartoon juggler is easy to accomplish -- all you have to do is draw one simple step at a time and your cartoon juggler will slowly, but surely, come to life.

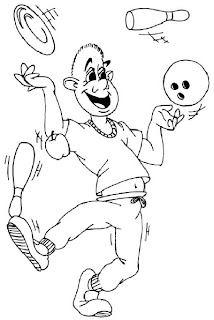
How to Draw a Cartoon JugglerIn this section, we'll show you how to draw the above cartoon juggler. You can draw this cartoon juggler freehand while looking at your computer monitor or print out this page to get a closer look at each step.

Follow the red lines in each illustration to learn exactly what to draw in that step. The lines drawn in previous steps are shown in gray. Here, we'll show you an illustration of each step and then give you a description of how to draw it.

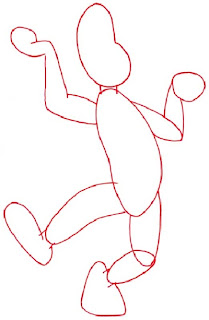
How to Draw a Cartoon JugglerStep 1: Start with a large potato-shaped body. Connect it to a kidney-shaped head using two short lines. For the arm and hand on your left, draw an L-shaped tube with its top attached to a J-shaped tube. Use a J-shape, two curved lines, and an odd-shaped oval for the other arm and hand.

Form the leg on your left with a long U-shape. Add two short lines and a partial oval for its ankle and foot. Sketch a long U-shape and an oval for the other leg. Attach two short lines and a rounded triangle for its ankle and foot.

How to Draw a Cartoon JugglerStep 2: Outline the juggled items with a large circle, small circle, rounded triangle, partial rounded rectangle, and oval. Use U-shapes and curved lines for the eyes and nose. For the mouth, cover a U-shape with a curved line.

Sketch the fingers, hands, and arms using curved lines, U-shapes, and J-shapes. Outline the clothing and shoes with curved lines, U-shapes, J-shapes, and L-shapes.

How to Draw a Cartoon JugglerStep 3: Draw each bowling pin with a long U-shape bent inward at one point. Attach an oval to the top bowling pin. Place a partial oval in the top oval to form a plate. Put three small circles in the larger circle for the bowling ball.

Connect a short curved line to a U-shape and another line to a curved V-shape to form the apple. Add folds to the clothing with U-shapes, Y-shapes, V-shapes, and a few curved lines. Form the ankle bands with short lines.

Draw a sole and detail the shoes with three curved lines (one long and two short). Show the ears, eyes, mouth, and chin using U-shapes, J-shapes, Y-shapes, and curved lines.

How to Draw a Cartoon JugglerStep 4: Use two short curved lines as the stripe on each bowling pin. Sketch a short curved line inside each hole in the bowling ball. Place a curved line and banana-shaped figure in the plate. Arrange short curved lines along the top of the head.

Add comma-shaped eyebrows and a teardrop-shaped belly button. Draw a zigzag line in each ear. Insert a curved line into the mouth. Detail the collar with many short lines. Put thin ovals in slightly larger ovals for the bowknot.

Show motion with curved lines (crisscross most of them) near one leg, one foot, and the juggled items.

How to Draw a Cartoon JugglerStep 5: Darken the eyebrows, irises, mouth, belly button, and bowling ball holes. Make the stem on the apple thicker. Use short lines to shade the soles of the shoes.

Your cartoon juggler is very entertaining. Bravo! Let's continue moving forward to a drawing that's sure to leave you winded.

Sunday, June 19, 2011

How to Draw an Overweight Jogger Cartoon

You’ve seen them in comic strips, in movies, and in numerous animated productions, but have you figured out hot to draw one yet? Don’t worry -- with our simple instructions, you can learn how to draw an overweight jogger cartoon.

To draw an overweight jogger cartoon, examine the illustration of the overweight jogger cartoon before proceeding to step 1.
Learn how to draw this overweight jogger cartoon.

In this section, we'll show you how to draw the above overweight jogger cartoon. You can draw this overweight jogger cartoon freehand while looking at your computer monitor or print out this page to get a closer look at each step.

Follow the red lines in each illustration to learn exactly what to draw in that step. The lines drawn in previous steps are shown in gray. Here, we'll show you an illustration of each step and then give you a description of how to draw it.

To begin drawing an overweight jogger cartoon, draw a large circle for the body, the head, neck, and limbs.

Step 1: Start with a large circle with a slightly pointed end for the body. Draw a circle with a nearly flat bottom for the head. Use two short lines for the neck.

Form the legs, ankles, and feet with ovals (one partial), U-shapes, and four short lines.

When drawing an overweight jogger cartoon, draw the clothing, headband, and shoes. Draw the facial features and define the limbs.

Step 2: For the clothing and shoes, connect curves, J-shapes, U-shapes, and V-shapes. Stack a potato-shape, long tube, U-shapes, and V-shapes for the hair and headband. Turn over U-shapes for the eyes.

Draw a line under one eye. Place a circle and U-shape by a larger circle for the nose. Shape the cheek and chin. Sketch an oval, curve, and U-shapes for the shoulder and arms.

Add an oval, circle, and lines for the wrists and hands. Connect U-shapes and J-shapes for the sun and cloud. Show the ground with curves.

When drawing an overweight jogger cartoon, add the eyes, hair, ear, fingers, and workout clothes and accessories.

Step 3: Attach very short lines to curved V-shapes for the eyelids and irises. Add J-shapes, U-shapes, and V-shapes to the hair, ear, and face. Detail the chin with two curves.

Place a collar and elastic waistbands on the sweat suit using long curves. Draw U-shaped wristbands and ankle bands. Use short curves and two teardrop-shaped figures to show the folds in the clothing.

Define the shoulders with four curves. Connect U-shapes and curved lines for the hands and fingers. Add a curved V-shape and three curves to the shoes.

When drawing an overweight jogger cartoon, draw the breath, flowers, and sweat on the belly.

Step 4: Draw comma-shaped eyebrows and J-shaped hairs on the head. Connect lines, U-shapes, and J-shapes for the breath. Use many short curves to detail the elastic bands on the sweat suit.

Sketch laces and a shoe design using ovals, V-shapes, and curved lines. Form the bowknot on the sweatpants with a tiny circle, U-shapes, and teardrop-shaped figures. For each flower, surround a circle with attached U-shapes.

Use a short curve for each stem. Place two curves near the foot on your left. Show teardrop-shaped sweat on the belly.

To finish drawing an overweight jogger cartoon, darken the eyebrows and irises. Cloud the rear. Add grass, sweat, and sunshine.

Step 5: Darken the eyebrows and irises. Use short curved lines to shade the cloud and the jogger’s rear. Replace the ground lines with curved V-shapes for the grass.

Place three teardrop-shaped figures above the head to show more sweat. Use straight lines to show the sunshine.

Your overweight jogger cartoon shaped up very well in the end. Well done. Not only will our next drawing exercise help sharpen your art skills, you may even learn a new trick or two.

Friday, June 17, 2011

How to Draw a Sad Clown Cartoon

Everyone loves to draw a happy clown cartoon, but why not learn how to draw a sad clown cartoon instead? Drawing a high-quality sad clown cartoon can be accomplished with a little patience, a few easy steps, and a big imagination.

To draw a sad clown cartoon, examine the illustration of the sad clown cartoon before proceeding to step 1.
Learn how to draw this sad clown cartoon.

In this section, we'll show you how to draw the above sad clown cartoon. You can draw this sad clown cartoon freehand while looking at your computer monitor or print out this page to get a closer look at each step.

Follow the red lines in each illustration to learn exactly what to draw in that step. The lines drawn in previous steps are shown in gray. Here, we'll show you an illustration of each step and then give you a description of how to draw it.

When drawing a sad clown cartoon, start by drawing an egg-shaped head. Add an oval with four nearly flat sides.

Step 1: Start with an egg-shaped head. Under and through the head sketch an oval with four nearly flat sides.

To draw a sad clown cartoon, outline the ears, eyes, forehead, nose, frown, and collar. Outline the hands and cuffs.

Step 2: Outline the ears, eyes, and forehead with U-shapes and curved lines. Use an oval and curved line for the nose and frown. Form the collar using connected U-shapes.

Attach a J-shape to a U-shape for each hand. Connect the hands with a short line. Place a thin rectangle between the hands. Sketch curved lines and curved rectangles for the cuffs.

When drawing a sad clown cartoon, add the hat, define the eyes, and draw mouth make-up. Shape the limbs.

Step 3: Place a curved tube under a figure resembling a slice of bread for the hat. Use U-shapes and J-shapes for the irises, pupils, eyelids, and inner ear. Draw a curved tube and short lines for the mouth makeup.

Shape the collar, shoulders, arms, and elbows. Add U-shaped and J-shaped fingers. Put short curves in the thumbs. For each glove’s wristband, attach a short line to a longer curve.

When drawing a sad clown cartoon, detail the face and add a large teardrop. Draw the flower.

Step 4: Detail the face with one short line, triangles, tiny circles, and a tiny L-shape. Add a large teardrop. Outline the hatband with a long curve. Form elbow patches with many short lines that crisscross five longer lines.

Add creases to the coat and shape the curved cuffs. Place a long curve in each oval button. Connect upside-down J-shapes to an oval for the flower. Put a curve in each teardrop-shaped petal.

To finish drawing a sad clown cartoon, darken the pupils. Shade the collar, arms, cuffs, buttons, flower/flowerpot, nose, and hatband.

Step 5: Darken all of both pupils except for the two tiny circles drawn previously. Use many short lines to shade the collar, arms, cuffs, buttons, flower, flowerpot, nose, and hatband.

There, all finished. Your sad clown cartoon looks perfect! It's time to pick up the pace and move on to our next cartoon drawing.

Tuesday, June 14, 2011

How to Draw a Cartoon Soldier

From Beetle Bailey to G.I. Joe, American cartoon soldiers have been around for decades. If you would like to learn how to draw these famous cartoon soldiers, practice drawing a cartoon soldier with our easy instructions first. Before you know it, you’ll be drawing these popular cartoon soldiers on your own.

To draw a cartoon soldier, examine the illustration of the cartoon soldier before proceeding to step 1.
Learn how to draw this cartoon soldier.

In this section, we'll show you how to draw the above cartoon soldier. You can draw this cartoon soldier freehand while looking at your computer monitor or print out this page to get a closer look at each step.

Follow the red lines in each illustration to learn exactly what to draw in that step. The lines drawn in previous steps are shown in gray. Here, we'll show you an illustration of each step and then give you a description of how to draw it.

To begin drawing a cartoon soldier, draw a fat, L-shaped body and potato-shaped head. Form a tree trunk and branches.

Step 1: Begin with a large, fat L-shaped body. Use two short lines to connect it to a potato-shaped head. Form the tree trunk with two lines. Outline the leaf-filled branches with long curved lines.

When drawing a cartoon soldier, form the helmet, tree limbs, and roots. Draw the arms, hands, and feet.

Step 2: Connect an upside-down U-shape to a curved line with curled edges for the helmet. Form the tree limbs and roots with V-shapes and curved lines. For the arm, attach one side of a V-shape with outward curving edges to a U-shape lying underneath it.

Use two short lines for the wrist. Form the hand with a U-shape lying on its side. Draw curved lines and L-shapes for the legs. Add parallel lines for the ankles. Sketch ovals with slightly pointed ends for the feet.

When drawing a cartoon soldier, define the face. Draw the neck, collar, shoulders, clothing and a bird.
Step 3: Use a V-shape, U-shapes, and a line for the eye, nose, mouth, chin, and ear. Draw curves and a rectangle for the neck, collar, and shoulder. Form the hand with U-shapes and curves.

Outline the pants and boots with a teardrop-shaped figure, two rectangles, V-shapes, and curves. Sketch the bird with rounded triangles, an oval, and curves. Attach U-shapes to form leaves.

When drawing a cartoon soldier, add hair, leaves to the helmet, and a smile. Shape the bird. Define the boots.

Step 4: Arrange short curved hairs. Use V-shapes and pointed ovals for the helmet’s leaves. Draw one short line and two longer ones for the cheek and smile. Form a buttoned sleeve pocket with two U-shapes and a circle.

Button the cuff with an oval. Use oval fingernails. Detail the boots with curved tubes and lines. Shape the bird with an oval, Y-shape, U-shape, and V-shapes.

To finish drawing a cartoon soldier, outline the eyelashes and add Z-shapes. Define the bird, helmet leaves, clothing, and tree.
Step 5: Outline the eyelashes. Add thick, dark Z-shapes to show snoring. Use nearly parallel lines to partially darken the camouflage. Shade the soles, boots, waistband, and helmet with short lines.

Form the bird’s eye with a tiny circle. Draw its wing, legs, and claws with short curved lines. Place curved lines in the helmet’s leaves. Add long curved lines to the tree trunk and main limb.

Good Job! While your cartoon soldier catches some zzz's, let’s continue to the next page to learn how to draw one of the world’s most popular entertainers.

Thursday, June 9, 2011

How to Draw a Cartoon Robot

If you’ve ever wanted to learn how to draw a cartoon robot, it’s never been easier. Once you’ve completed our cartoon robot using our simple steps, you’ll be on your way to designing and drawing your own special robot creations.

To draw a cartoon robot, examine the illustration of the cartoon robot before proceeding to step 1.
Learn how to draw this cartoon robot.

In this section, we'll show you how to draw the above cartoon robot. You can draw the cartoon robot freehand while looking at your computer monitor or print out this page to get a closer look at each step.

Follow the red lines in each illustration to learn exactly what to draw in that step. The lines drawn in previous steps are shown in gray. Here, we'll show you an illustration of each step and then give you a description of how to draw it.

When drawing a cartoon robot, start by drawing a rectangle and a large U-shape. Draw three ovals for the wheels.

Step 1: Start with a rectangle with two slanted sides. Place a large U-shape upside down on the rectangle. Draw three ovals for the wheels.

To draw a cartoon robot, form fenders for each outer wheel. Add tubes, eyes, and a smile.

Step 2: Use oddly curved V-shapes to form fenders for each outer wheel. For the other fender, start with a V-shape. To its ends add lines that curve up, to your left, and then down.

Add ovals for the eyes. Draw a curved line for the smile. Place a tube with rounded ends on top of a tube with pointed odd-shaped ends.

Through the bottom of the lower tube place a curved U-shape that is upside down and has its open end covered by a line.

When drawing a cartoon robot, add arms, dimples, eyes, and a mouth. Attach fenders to the body with curved lines.
Step 3: Add arms using a curved U-shape on its side and a figure shaped like a large backward comma. For the dimples and mouth, sketch six short lines, a circle, and a curved line.

Use partial circles for the irises. Draw a banana-shaped figure and a curved triangle for the eyelids. Attach the fenders to the body with curved lines (“legs”).

When drawing a cartoon robot, draw the hands, and eyebrows. Outline the tires and form teeth and the grille.
Step 4: Connect two horseshoe-shaped figures with a circle to form the hand on your left. Use two ovals and two horseshoe-shaped figures for the hand on your right. Draw zigzag lines in the arms. Between the arms, attach four rectangles.

Outline part of the tires with curved lines. Place a thin oval in the wheel on your right. Use straight lines to form teeth and the grille at the bottom. Add comma-shaped eyebrows.

To finish drawing a cartoon robot, darken the irises and wheel well. Shade the head, body, tires, and legs.
Step 5: Darken the irises, wheel well, and center of the wheel on your right. Use straight and curved lines to shade the head, body, tires, "legs," and the hand on your right.

To show movement, crisscross some curved lines near two of the wheels and the hand on your right.

Your cartoon robot is ready to follow your commands. Continue to the next page to learn how to draw another disciplined character.