Sunday, May 27, 2012

How to Draw the Sydney Opera House in 5 Steps

Australia's Sydney Opera House is one of the mo­st recognizable buildings in the w­orld. You'll have a great time learning how to draw this unique and beautiful building.

How to Draw the Sydney Opera House in 5 StepsIn this section, we'll show you how to draw the Sydney Opera House. You can draw it freehand while looking at your computer monitor, or you can print out this page to get a closer look at each step.

Here, we'll show you an illustration of each step and then give you a description of how to draw it. Follow the red lines in each illustration to learn exactly what to draw in that step. The lines drawn in previous steps are shown in gray.

How to Draw the Sydney Opera House in 5 Steps1. Rectangles and Triangles

Sketch the basic shape of the building with two horizontal lines, rectangles, and triangles.


How to Draw the Sydney Opera House in 5 Steps2. Arches

Add different levels to the rectangles using straight lines. Form arches on the triangles and below using curved lines.


How to Draw the Sydney Opera House in 5 Steps3. Curve Lines

Detail the arches using curved lines that join at the top. Draw a curved line under the lower left-hand arch. Add additional curved lines to the arches on the right-hand side as shown.

Draw straight horizontal lines to two sections of the left-hand rectangle. Sketch an odd-shaped diamond. Add the door with an incomplete rectangle.

How to Draw the Sydney Opera House in 5 Steps4. Ribs and Water

Sketch ribs on the arches with curved lines. Draw squiggles for the ­water line. Detail the building with rectangles, a V-shaped figure, and horizontal lines.
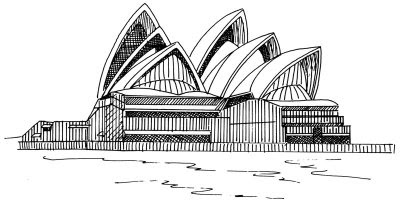
How to Draw the Sydney Opera House in 5 Steps5. Details

Finish the drawing by adding many straight vertical lines for the wood and arches. Draw diagonal lines inside the arches and windows to show depth.

Your drawing is finished! Even if you don't get it right the first time, keep practicing until you're happy with your drawing. A classic diner is a great place to meet for food and fun

Thursday, March 22, 2012

How to Draw a Rural Lane in 5 Steps

With a forest silhouette in the background and a canopy of trees in the foreground, this rural lane is a peaceful nature scene. This landscape is a wonderful drawing challenge for nature lovers.

In this article, we'll show you how to draw this rural lane landscape. You can draw it freehand while looking at your computer monitor, or you can print out the article to get a closer look at each step.

On each page, we'll show you an illustration of each step and then give you a description of how to draw it. Follow the red lines in each illustration to learn exactly what to draw in that step. The lines drawn in previous steps are shown in gray.

Ready to get started? It all begins with a horizontal line ...

How to Draw a Rural Lane in 5 Steps
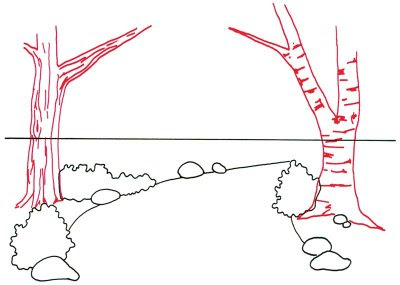
1. Sketch the Horizon and Road

­L­ightly draw a horizon line just above the center of the page. Rough in two long, curving lines that come together somewhat for the outline of the road. Draw a few large ovals for rocks, placing them randomly along the sides of the road. Make three bushes with squiggly lines to define the roadway and distinguish it from the surrounding fields.

How to Draw a Rural Lane in 5 Steps2. Fill in the Trees

Sketch a tree and branches on the left, with a tall main trunk. Show the bark on the side of the trunk with long up-and-down lines. Use short horizontal lines for the tree on the right, a birch, which has a smaller main trunk.

When filling in lines on the birch, notice that the lines are roughly horizontal, not vertical like the other tree's. These trees look pretty bare, so we'll give them leaves in the next step.

How to Draw a Rural Lane in 5 Steps3. Add Leaves

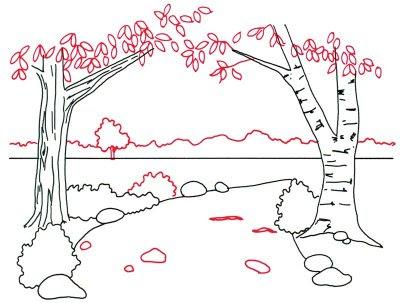
­D­raw a squiggly line across the page, just above the horizon line, to indicate the tops of distant trees. Add smaller branches to the trees with a few crooked lines.

Arrange dozens of leaves in random clumps by sketching shapes like teardrops. Place one more tree in the background and another bush by the roadway with squiggly, circular lines. Sketch several irregular oblong shapes on the road to look like rocks and stones.

How to Draw a Rural Lane in 5 Steps4. Roughen the Roadway

­Make a series of roughly parallel lines to look like ruts on the surface of the roadway. Sketch several clumps of tall grass at the edge of the road and around the bushes. Shape them like spikes: mostly upright, but a few are bent over.

We're almost finished! On the next page, we'll put the finishing touches on your rural lane landscape.

How to Draw a Rural Lane in 5 Steps5. Add Shading

­Heavily shade the area between the horizon and the top of the tree line. Add short, squiggly lines to the distant tree. Use the same method for the bushes along the roadway. Sketch a few very short lines to look like tufts of grass in the field. As the last step, lightly shade the rocks.

How to Draw a Rural Lane in 5 StepsYour landscape drawing is finished! Even if you don't get it right the first time, keep practicing until you're happy with your drawing.

Saturday, February 25, 2012

How to Draw Cement Trucks in 10 Steps

For big jobs that need lots of cement, this truck carries it right where it is needed. Once you learn how to draw this cement truck, you can drive it all over your imagination.
In this article, we'll show you how to draw the above cement truck. Either draw it freehand while looking at your computer monitor or print out this page to get a closer look at each step.

Follow the red lines in each illustration to learn exactly what to draw in that step. The lines drawn in previous steps are shown in gray. Here, we'll show you an illustration of each step and then give you a description of how to draw it.

Ready to get started? Check out the next page for the first step.

How to Draw Cement Trucks in 10 Steps1. Draw the Fender and Hood

­ For the cement truck, start by drawing the shapes that make up the front fender, hood, and grille.

On the next page, we'll start drawing the cab.

How to Draw Cement Trucks in 10 Steps2. Begin Drawing the Cab

­Draw a square with rounded corners behind the shape you just drew. This is the cab. Just below the grille, draw a slightly curved rectangle to make the front bumper.

Next, we'll add the windshield

How to Draw Cement Trucks in 10 Steps3. Add the Windshield and Tires.

Put windows in the cab. The front windshield is a curved rectangle, and the side window is a rounded, squarish shape. Draw one of the front wheels facing you, as shown; draw a half-circle on the other side of the truck for the other front wheel.

Next, we'll add the gas tank.

How to Draw Cement Trucks in 10 Steps4. Draw the Gas Tank

Draw a square shape below the cab; add a small rectangle at the top of this square. Draw a rounded shape with a circle at the front end for the gas tank. Draw the rear fender, outlining it to add depth.

Up next, we'll draw the rear wheels.

How to Draw Cement Trucks in 10 Steps5. Draw the Rear Wheels

Draw the rear tires (there are three rear tires visible from this angle). Draw the arm that holds the cement barrel in place. This piece starts behind the gas tank and goes up to behind the cab -- it is slightly bent where it touches the cab. Add a very small straight line right behind the door.

Next, we'll learn how to draw the cement barrel.

How to Draw Cement Trucks in 10 Steps6. Add the Cement Barrel

Draw the cement barrel, which looks a bit like the body of a bee. It is made up of three overlapping circles with a rounded triangle at the end.

Up next, we'll add a ladder to the rear of the vehicle.

How to Draw Cement Trucks in 10 Steps7. Add Hooks to the Bumper and a Ladder

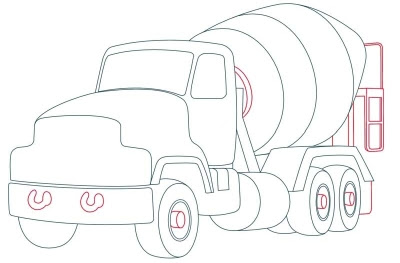
Add details such as two U-shape hooks on the front bumper, oval wheel hubs, and part of a rectangle behind the rear wheels for a mud flap. To finish the cement barrel, draw two semicircles, one in front of the other, at the front of the cement barrel. Draw the ladder and platform at the back of the cement barrel. Study the picture, and use a ruler to make straight lines.

We'll add more detail to the cab on the next page.

How to Draw Cement Trucks in 10 Steps8. Add Detail to the Cab

Finish the details of the cab. Draw rectangular side mirrors, with two narrow rectangles attaching each mirror to the side of the cab. Draw four wedge-shape lights above the windshield, and sketch a candy-cane shape for the exhaust pipe coming out between two of the lights. Inside the cab, draw two semicircles, one just inside the other, for the top of the steering wheel. Draw the side and back windows, adding the line of the cement barrel.

Up next, we'll draw the grill and headlights.

How to Draw Cement Trucks in 10 Steps9. Add the Grill and Headlights

Draw and outline two squares for the headlights. Draw a large rectangle with five long rectangles inside it -- all have rounded corners -- on the grille. Add the small horizontal line behind the front tire.

We're almost done. We'll add the final touches next.

How to Draw Cement Trucks in 10 Steps10. Add the Final Touches

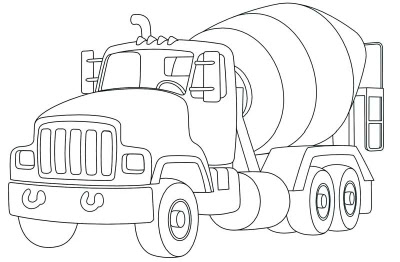
­Use a felt-tip pen to trace over the lines you want to keep, and erase the extra pencil lines.

How to Draw Cement Trucks in 10 StepsThat's it! Even if you don't get it right the first time, keep practicing until you're satisfied with your drawing. Learn how to draw a roller, a great complement to the cement truck, in the next article­.