Saturday, August 13, 2011

How to Draw a Poppy in 5 Steps

A poppy is probably one the m­ost flamboyant flowering plants in the world. Due to its bold red color and because it grows in groups, the showy poppy can be se­en from hundreds of feet, even miles, away. Poppies are also white, pink, yellow, orange or blue in color.

In this section, we'll show you how to draw the above poppy. You can draw this flower freehand while looking at your computer monitor or print out this page to get a closer look at each step.

Follow the red lines in each illustration to learn exactly what to draw in that step. The lines drawn in previous steps are shown in gray. Here, we'll show you an illustration of each step and then give you a description of how to draw it.

How to Draw a Poppy in 5 Steps1. Sketch the Outline

Lightly sketch a large oval for a flower and a smaller circle for a bud. Sketch the stems with curving lines. Sketch in three other curving lines to show the position of the leaves.

How to Draw a Poppy in 5 Steps2. Sketch the Petals

Sketch roughly triangular petals using wavy lines. Draw an arc shape for the center of the flower. Outline the bud and show petals by drawing a wavy, Y-shaped line. Draw in a second line for each stem.

How to Draw a Poppy in 5 Steps3. Petals and Leaves

Draw the petals more carefully using wavy lines to suggest ruffled edges. Add two inner petals as shown. With curving lines, draw leaf shapes with deep notches in the edges.

How to Draw a Poppy in 5 Steps4. Stems and Veins

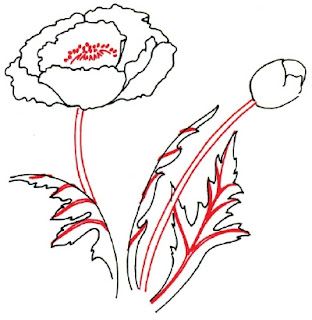
Define the center of the flower with several inverted V-shaped lines. Above them, draw a row of tiny ovals. Draw the two stems, making the sides as smooth as possible.

In the right-hand leaf, draw veins with branches, using curved double lines. You can see only the sides of the other two leaves, so draw veins from the smooth line to the irregular line.

How to Draw a Poppy in 5 Steps5. Shading and Details

Add many small dots and short lines to the center of the flower. Shade the edges of all the petals and leaves using short lines. Vary the length of the lines.

How to Draw a Poppy in 5 StepsShade the bottoms of the flower and bud. Use very short lines to shade one side of each stem. Add a few small spikes at the top of each stem with short, V-shaped lines.

Take a bow. Your poppy drawing is complete! Let's move on to yet another show-stopper -- the gorgeous, golden yellow, daffodil.

Continue to the next section to learn how to draw a daffodil.


Monday, August 8, 2011

How to Draw a Bear in 4 Steps

Dr­awing this friendly brown bear is a great way to improve your drawing skills.

In this section, we'll show you how to draw the above bear. Either draw it freehand while looking at your computer monitor or print out this page to get a closer look at each step.

Follow the red lines in each illustration to learn exactly what to draw in that step. The lines drawn in previous steps are shown in gray. We'll show you an illustration of each step and then give you a description of how to draw it.

How to Draw a Bear in 4 Steps1. Draw the Body

Sketch an oval for the body. Add a circle for the head and three ovals or circles for the ears and snout.

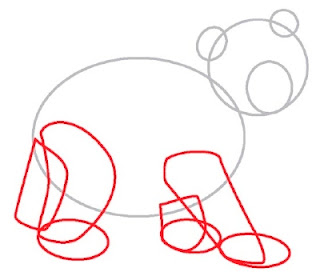
How to Draw a Bear in 4 Steps2. Draw the Legs

Draw the leg shapes, and follow them with ovals for the paws.

How to Draw a Bear in 4 Steps3. Draw the Face and Tail

Add lines for the neck to connect the head to the rest of the body. Draw ovals and circles for the eyes and pupils, lines for the eyelids, and ovals for the details inside the ears. Add one more oval for the tail. Inside the snout, draw a triangle nose. Add some curved lines for the mouth.

Finish sketching by adding hair details on the back and head and details on the toes.

How to Draw a Bear in 4 Steps4. Trace and Erase

Trace the pencil ­lines you w­ant to keep with a felt-tip pen, and erase any extra lines.

How to Draw a Bear in 4 StepsNow that your bear drawing is finished, bring it to life by coloring it. Next, we'll show you how to draw an animal that loves the water.


Wednesday, August 3, 2011

How to Draw the Taj Mahal in 5 Steps

W­ith­ its intricately detailed exterior, the majestic Taj Mahal is one of the world's most wonderful works of architecture. Learn how to draw this building for a truly special addition to your repertoire.

In this section, we'll show you how to draw the Taj Mahal. You can draw it freehand while looking at your computer monitor, or you can print out this page to get a closer look at each step.

Here, we'll show you an illustration of each step and then give you a description of how to draw it. Follow the red lines in each illustration to learn exactly what to draw in that step. The lines drawn in previous steps are shown in gray.

How to Draw the Taj Mahal in 5 Steps1. Outline

Draw a horizontal line on the bottom of the page. Add a double set of horizontal lines above it. Sketch six sets of double vertical lines perpendicular to the double horizontal lines. On the outer left- and right-hand sides, sketch slightly bent lines to connect the two sets of double vertical lines as shown.

Connect the middle two sets of double vertical lines with intersecting horizontal lines. Add two more horizontal lines to connect the tops of the remaining vertical lines. Draw a double set of horizontal lines on the rectangles as shown.

How to Draw the Taj Mahal in 5 Steps2. Domes

Add ovals to the tops of the four posts. Draw a horizontal line through the center of each oval. Sketch a slightly curved line connecting the two center ovals. Draw the center dome with a half-circle. Add a second curved line and a horizontal line underneath the center dome as shown.

Sketch a sideways V-shape on each side of the large dome. Add vertical lines underneath. Top each V-shape with a dome. Add arches with double curved lines and pointed tops. Use straight horizontal lines underneath some of the arches as shown. Detail the surface with vertical and horizontal straight lines and rectangles.

How to Draw the Taj Mahal in 5 Steps3. Arches

Cap the domes with odd-shaped V-figures. Add a half-circle to the top of the center dome. External a short vertical line from the top of each dome. Detail the surface with straight vertical and horizontal lines. Draw an arch for the doorway. Add a curved line to the top of the arch. Use straight vertical and horizontal lines for the door.

How to Draw the Taj Mahal in 5 Steps4. Details

Detail the center dome with curly and dashed lines. Begin the grillwork with straight vertical and horizontal lines that intersect. Draw a double arch over the doorway and two horizontal lines underneath it. Add an arched doorway with a curved line over the top of the arch. Detail the base with two squares in each rectangle.

How to Draw the Taj Mahal in 5 Steps5. Shading

Shade the center dome with curved, straight and broken lines. Draw curly lines over all the arches. Shade the windows on the side domes with diagonal lines. Add a heavy black line to the bottom of each. Draw bars on all the arches that have grillwork with intersecting horizontal and vertical lines.

How to Draw the Taj Mahal in 5 StepsShade these arches with crisscross lines. Use straight horizontal and vertical lines to finish the details on the doorway. Shade the upper left-hand half of the doorway with crisscross lines.

Your drawing is finished! Even if you don't get it right the first time, keep practicing until you're happy with your drawing.