Thursday, September 29, 2011

How to Draw Diners in 5 Steps

Th­is ­diner promises good times an­d good food. Every detail of this building -- from­ the windows to the signage -- brings to mind the classic diners of the 1950s.

In this section, we'll show you how to draw this diner. You can draw it freehand while looking at your computer monitor, or you can print out this page to get a closer look at each step.

Here, we'll show you an illustration of each step and then give you a description of how to draw it. Follow the red lines in each illustration to learn exactly what to draw in that step. The lines drawn in previous steps are shown in gray.

How to Draw Diners in 5 Steps1. Perspective Lines

Use the exercise on perspective and vanishing points to establish the basic shape of the diner.

How to Draw Diners in 5 Steps2. Sketch the Structure

Sketch the shape of the windows, door, and side details using the rules on drawing lines that are parallel to the basic structure found in the introductory exercise. Add curl­y details to the roof as shown.

How to Draw Diners in 5 Steps3. Stairs and Door

Establish the sign over the diner and the stairs using the rules on vanishing points.

Draw the shape of the stairs using three lines that meet at the right-hand side. Add steps with straight lines. Separate the windows with straight single and double lines. Draw two rectangles for the glass in the door. Add odd-shaped figures for the pipes on the roof as shown.

How to Draw Diners in 5 Steps4. Sign and Decor

Print the name of the diner on the sign. Detail the roof with four curved lines and odd-shaped figures. Draw horizontal lines in the windows for the shades. Add a short vertical line ending in a blackened circle underneath. Detail the side and front with double lines.

Draw curves at the top and bottom of the door and two horizontal lines in the middle. Use straight vertical and horizontal lines for the banister. Add a line parallel with the bottom of the front of the building for the parking lot. Extend parallel straight lines for the parking spaces.

How to Draw Diners in 5 Steps5. Details

Shade the pipes on the roof with diagonal lines. Add grillwork to the windows with intersecting vertical and horizontal lines. Finish the banister with vertical lines. Add blackened lines to the sign and parking spots for shading.
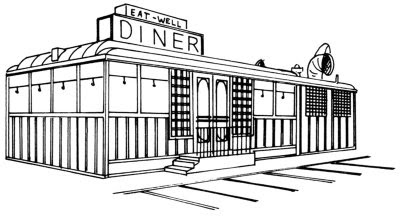
How to Draw Diners in 5 StepsYour drawing is finished! Even if you don't get it right the first time, keep practicing until you're happy with your drawing.


Monday, September 19, 2011

How to Draw Excavators in 11 Steps

Though it may look like a creature from outer space, this versatile construction vehicle is useful for everything from demolition and digging up dirt to open-pit mining and placing pipes.

In this article, we'll show you how to draw the above excavator. You can draw this construction vehicle freehand while looking at your ­computer monitor or print out this page to get a closer look at each step. Follow the red lines in each illustration to learn exactly what to draw in that step. The lines drawn in previous steps are shown in gray. Here, we'll show you an illustration of each step and then give you a description of how to draw it.

Are you ready to get started drawing this amazing machine? Head over to the next page for the first step.

How to Draw Excavators in 11 Steps1. Draw the Body Outline

Draw the shapes that make up the excavator's cab and platform.

On the next page, we'll draw the windows.

How to Draw Excavators in 11 Steps2. Draw the Windows

Add windows on the cab. There are two in front of the cab and four on the side. Add a roof by drawing two rounded rectangular shapes side by side.

On the next page, we'll learn how to draw the exhaust pipe.

How to Draw Excavators in 11 Steps3. Add the Light and Muffler

Draw two circles on the front of the roof and a safety light on top. Draw a muffler, which is oblong with a curved pipe running through it. Draw a circle at the end of the pipe.

We'll begin drawing the tracks on the next page.

How to Draw Excavators in 11 Steps4. Draw the Track

To draw the track, start with a rounded triangle. Draw another triangle just inside the first one. Inside the triangle, draw a rectangle and add part of a circle at each end. Draw three more circles above the rectangle, adding lines for depth.

On the next page, we'll continue drawing the tracks.

How to Draw Excavators in 11 Steps5. Add the Treads

Draw the track on the far side, where only some of the parts can be seen. Finish the tracks by using a ruler to draw evenly spaced lines around the outside of each one for tread.

Up next, we'll draw the boom for the shovel.

How to Draw Excavators in 11 Steps6. Add the Boom

To draw the arm of the boom, draw a long rectangle with a slight boomerang bend. Just above the bend, draw a rounded triangle. At the top of the boom, draw a long oval shape. Outline all parts of the boom arm to add depth.

We'll continue work on the boom on the next page.

How to Draw Excavators in 11 Steps7. Draw the Lower Boom

Draw the shape that makes up the bottom of the boom -- a long, skinny oval with a bump on one side. Outline it to add depth.

On the next page, we'll draw the bucket.

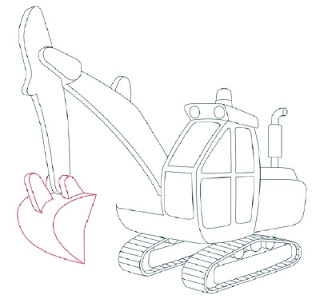
How to Draw Excavators in 11 Steps8. Draw the Bucket

To draw the bucket, draw a crescent shape and connect the tips with an almost-straight line. On top of the bucket, draw two rounded triangles; outline them to add depth. Add lines to create the triangle behind the bottom of the boom.

We'll work on the hydraulics on the next page.

How to Draw Excavators in 11 Steps9. Add the Hydraulics

Add circles for the pivot joints, which allow the boom and bucket to move up and down. Outline each circle for depth. Draw the two hydraulic cylinders using long rectangles and cylinders.

Up next, we'll add the boom hydraulics.

How to Draw Excavators in 11 Steps10. Add the Boom Hydraulics

Draw the two hydraulic cylinders that attach the boom to the body of the cab. Draw the line behind the cylinders to complete the platform.

We're almost done! We'll finish up on the next page.

How to Draw Excavators in 11 Steps11. Finish the Drawing

Use a felt-tip pen to trace over the lines you want to keep, and erase the extra pencil lines.

How to Draw Excavators in 11 StepsAll done, but there's just one problem. Once the excavator scoops all of the materials up and out, what on earth will they use to move it all? You guessed it -- a bulldozer!