Sunday, October 23, 2011

How to Draw a Violet in 5 Steps

The viole­t has a whopping 400-5­00 species throughout the world and it is popular for its many delightful scents. This flowering plant is the color of violet, of course, but it can also be blue, yellow, white or even a combination of yellow and white.

In this section, we'll show you how to draw the above violet. You can draw this flower freehand while looking at your computer monitor or print out this page to get a closer look at each step.

Follow the red lines in each illustration to learn exactly what to draw in that step. The lines drawn in previous steps are shown in gray. Here, we'll show you an illustration of each step and then give you a description of how to draw it.

How to Draw a Violet in 5 Steps1. Rough Outline

Lightly sketch four circles to show the position of the flowers. Lightly sketch two heart shapes below them for leaves. Sketch curving lines for the stems.

Behind the flowers, sketch three more leaf shapes using curved lines.

How to Draw a Violet in 5 Steps2. Sketch Petals and Leaves

Within the circles, sketch petals using circular shapes. Outline the leaves with scalloped lines. For the leaves behind the flowers, show that they are folded over.

Do this by drawing one side of the shape with a curving line. Draw a second, scalloped line inside the shape.

How to Draw a Violet in 5 Steps3. Stems and Scallops

Draw the outlines of the petals with slightly scalloped lines. Draw two short, curving lines in each petal to show ridges. Draw in the stems.

Add a scalloped line at the bottom of the stems. Draw a small arc below the scalloped line.

How to Draw a Violet in 5 Steps4. Veins

Draw in the veins of the bottom leaves using double branched lines. In the leaves that are folded, the center vein can't be seen.

Draw narrow V shapes that curve toward the scalloped edges. Draw tiny circles for the centers of the flowers.

How to Draw a Violet in 5 Steps5. Shading and Detail

Shade the leaves with short parallel lines on either side of the veins. Shade the edges of the leaves with very short lines.

How to Draw a Violet in 5 StepsUse just a few short lines to shade each of the petals at the tips, Shade the centers of the flowers with a few very short lines.

Saturday, October 8, 2011

How to Draw Backhoes in 11 Steps

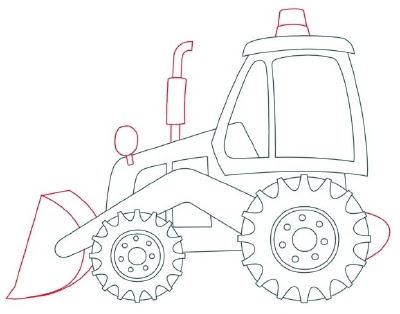
The backhoe is a versatile machine -- it can dig and scoop with its buckets on the front and back. The large bucket on this construction vehicle is attached to the end of an arm. Some say the arm looks like a giant human arm.

In this section, we'll show you how to draw the above backhoe. You can draw this construction vehicle freehand while looking at your computer monitor or print out this page to get a closer look at each step.

Follow the red lines in each illustration to learn exactly what to draw in that step. The lines drawn in previous steps are shown in gray. Here, we'll show you an illustration of each step and then give you a description of how to draw it.

Head over to the next page for the first step.

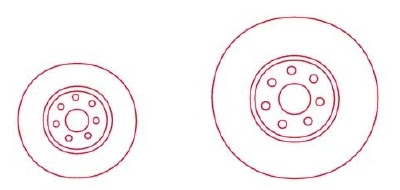
How to Draw Backhoes in 11 Steps1. Draw the Wheels

Begin by drawing the wheels, which are made up of many circles.

On the next page we'll draw the treads.

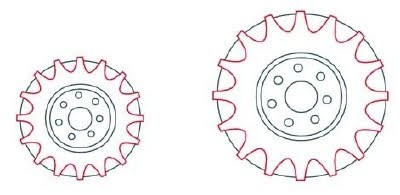
How to Draw Backhoes in 11 Steps2. Add the Treads to the Tires

To add tread to the tires, draw a star burst shape around each of the outside circles. This is fun to do!

On the next step we'll draw the body.

How to Draw Backhoes in 11 Steps3. Draw the Body

Draw the shape that makes up the body of the backhoe. Draw two rectangles inside the front of this shape. Be sure to round the one corner as shown.

Up next, we'll draw the cab.

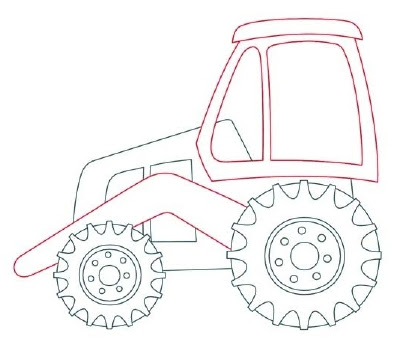
How to Draw Backhoes in 11 Steps4. Draw the Cab

Draw the cab; notice how the top is narrower than the bottom. Draw the windows in the cab. Draw the roof. On the side, draw a boomerang shape from the back wheel to past the front wheel.

Next, we'll draw the safety light and exhaust pipe.

How to Draw Backhoes in 11 Steps5. Draw the Light and Exhaust Pipe

­Draw the safety light on the cab roof, and draw the back of the headlight at the front of the hood. On the hood, draw the muffler, which is a rectangle with a pipe running through it.

For the front bucket, draw a half-circle, adding a point that juts out at the bottom. Outline the bucket to add depth. At the rear, draw a small bump behind the tire.

We'll add some detail to our backhoe on the next page.

How to Draw Backhoes in 11 Steps6. Add Detail to the Cab

Draw all the details on the far side of the backhoe that are visible from this side, including the other headlight, the windows on the other side of the cab, and the edge of the front tire on the far side.

Up next, we'll draw the boom.

How to Draw Backhoes in 11 Steps7. Draw the Boom

­Draw the arm for the backhoe scoop. It is made up of two curved rectangular shapes with rounded ends. Outline each rectangle for depth.

Draw the rounded triangular shape near the top of the lower arm.

Next, we'll draw the seat and steering wheel.­

How to Draw Backhoes in 11 Steps8. Draw the Seat and Steering Wheel

Draw the steering wheel and driver's seat inside the cab. Add detail lines for depth.

We'll add the scoop on the next page.

How to Draw Backhoes in 11 Steps9. Add the Scoop

Draw the backhoe scoop. Look at the example to see how it attaches to the boom.

We'll draw the hydraulics on the next page.

How to Draw Backhoes in 11 Steps10. Draw the Hydraulics

Add circles for the pivot points that move the arms up and down. Outline the circles where indicated to add depth. To finish your backhoe, draw two hydraulic cylinders.

On the next page, we'll finish our drawing.

How to Draw Backhoes in 11 Steps11. Add the Final Touches

­Use a felt-tip pen to trace over the lines you want to keep, and erase the extra pencil lines.

How to Draw Backhoes in 11 StepsDrawing the backhoe was great fun, huh? Even more fun is drawing every kid's favorite construction vehicle -- the popular dump truck.