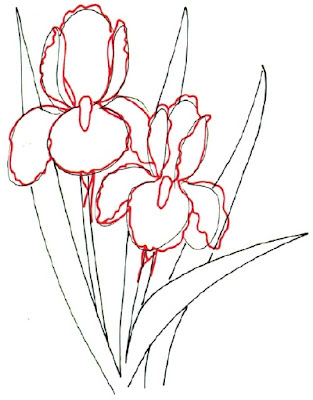
Much like a poppy, an iris is a showy flower. It is grown as an ornamental plant in gardens, and colors range from purple and sky-blue to yellow and a rare red.
In this section, we'll show you how to draw the above iris. You can draw this flower freehand while looking at your computer monitor or print out this page to get a closer look at each step.
Follow the red lines in each illustration to learn exactly what to draw in that step. The lines drawn in previous steps are shown in gray. Here, we'll show you an illustration of each step and then give you a description of how to draw it.
 1. Sketch the Petals
Lightly sketch an oval shape for the top of the flower. Underneath it, sketch a circle. For the second iris, sketch another oval and circle to the right and a little below the first set.
To make petals, sketch a sausage-shaped loop on both sides of the ovals. Sketch half-circles on both sides of the circles.
 2. Add Leaves
Add stems to the flowers by drawing two slightly curving lines coming down from each flower. Draw three long, narrow leaves behind the flowers.
Make sure the leaf lines don't go into the petals of the flowers. Draw another leaf curving below the two flowers.
 3. Outline the Blossoms
Give the flowers ruffled edges with wavy lines along the petal edges. Draw a rough, long oval in the center of each flower. Add a fold at the top of each stem by drawing two vertical lines to make the top of the stem wider.
Then draw a diagonal line across the stem. Draw a second diagonal line from the top of the stem to the center of the first line.
 4. Finish the Petals
Sketch many short lines all around the centers of the flowers to make them look fuzzy. On the lower petals of each flower, sketch in a wavy line as shown. Draw many tiny circles on both sides of the line.
Draw a series of parallel lines in the top area of each stem above the fold you drew in step 3. In the bottom leaf, draw the fold of the leaf with a long line through the center, following the curve of the leaf.
 5. Details and Shading
Add short, curving lines to the petals for shading. Vary the lengths of the lines. Use short lines to add shading on one side of each of the centers.
For the stems, draw in several long lines at the bottom and a few short lines at the top. Draw a series of long, vertical lines in each leaf, following the curve of the leaf.
 Your iris drawing is complete! Ready for another? Continue to the next section to learn how to draw a flaming red plant that some like to call "winter rose."