Jugglers are lots of fun to watch. Wouldn't it be great if you could learn how to draw these wacky characters in action in a few simple steps? You can!
Learning how to draw a cartoon juggler is easy to accomplish -- all you have to do is draw one simple step at a time and your cartoon juggler will slowly, but surely, come to life.
Learning how to draw a cartoon juggler is easy to accomplish -- all you have to do is draw one simple step at a time and your cartoon juggler will slowly, but surely, come to life.
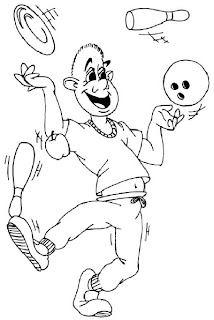
 In this section, we'll show you how to draw the above cartoon juggler. You can draw this cartoon juggler freehand while looking at your computer monitor or print out this page to get a closer look at each step.
Follow the red lines in each illustration to learn exactly what to draw in that step. The lines drawn in previous steps are shown in gray. Here, we'll show you an illustration of each step and then give you a description of how to draw it.
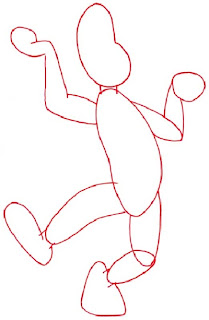
 Step 1: Start with a large potato-shaped body. Connect it to a kidney-shaped head using two short lines. For the arm and hand on your left, draw an L-shaped tube with its top attached to a J-shaped tube. Use a J-shape, two curved lines, and an odd-shaped oval for the other arm and hand.
Form the leg on your left with a long U-shape. Add two short lines and a partial oval for its ankle and foot. Sketch a long U-shape and an oval for the other leg. Attach two short lines and a rounded triangle for its ankle and foot.
 Step 2: Outline the juggled items with a large circle, small circle, rounded triangle, partial rounded rectangle, and oval. Use U-shapes and curved lines for the eyes and nose. For the mouth, cover a U-shape with a curved line.
Sketch the fingers, hands, and arms using curved lines, U-shapes, and J-shapes. Outline the clothing and shoes with curved lines, U-shapes, J-shapes, and L-shapes.
 Step 3: Draw each bowling pin with a long U-shape bent inward at one point. Attach an oval to the top bowling pin. Place a partial oval in the top oval to form a plate. Put three small circles in the larger circle for the bowling ball.
Connect a short curved line to a U-shape and another line to a curved V-shape to form the apple. Add folds to the clothing with U-shapes, Y-shapes, V-shapes, and a few curved lines. Form the ankle bands with short lines.
Draw a sole and detail the shoes with three curved lines (one long and two short). Show the ears, eyes, mouth, and chin using U-shapes, J-shapes, Y-shapes, and curved lines.
 Step 4: Use two short curved lines as the stripe on each bowling pin. Sketch a short curved line inside each hole in the bowling ball. Place a curved line and banana-shaped figure in the plate. Arrange short curved lines along the top of the head.
Add comma-shaped eyebrows and a teardrop-shaped belly button. Draw a zigzag line in each ear. Insert a curved line into the mouth. Detail the collar with many short lines. Put thin ovals in slightly larger ovals for the bowknot.
Show motion with curved lines (crisscross most of them) near one leg, one foot, and the juggled items.
 Step 5: Darken the eyebrows, irises, mouth, belly button, and bowling ball holes. Make the stem on the apple thicker. Use short lines to shade the soles of the shoes.
Your cartoon juggler is very entertaining. Bravo! Let's continue moving forward to a drawing that's sure to leave you winded.
No comments:
Post a Comment