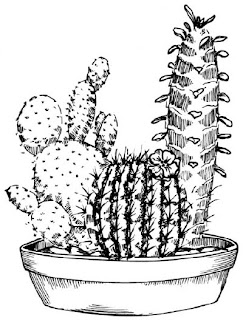
A cactus thrives in extremely dry and hot conditions. These unusual plants require very little water to survive and they can live up to 300 years or more, typically in the desert.
A cactus is both an ornamental plant, due to its spiky appearance, and a crop plant. Some believe a cactus great healing powers.
In this section, we'll show you how to draw the above cactus. You can draw this flower freehand while looking at your computer monitor or print out this page to get a closer look at each step.
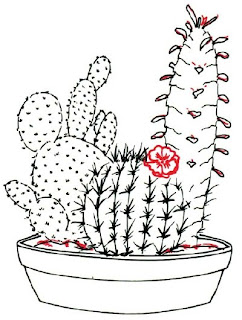
Follow the red lines in each illustration to learn exactly what to draw in that step. The lines drawn in previous steps are shown in gray. Here, we'll show you an illustration of each step and then give you a description of how to draw it.
 1. Outline
Lightly sketch a curving line for the top of the pot, then sketch two short lines to begin the sides. Lightly sketch an unfinished circle shape for one cactus.
Behind it, sketch an unfinished oval shape for another cactus. Sketch a very long, thin oval for the third cactus.
 2. Branches
Finish the pot with curving lines. Draw many oval branches on the left-hand cactus. On the center cactus, sketch a circle to show where a flower will go.
 3. Leaves
Draw leaves on the tall cactus using teardrop and heart shapes. Draw ridges in the center cactus using vertical lines. Put in the ground with a wavy line.
 4. Spines and Ridges
For spines, draw groups of three short lines all over the left-hand cactus. On the center cactus, draw groups of longer lines along the ridges.
Draw ridges in the right cactus with irregular lines as shown.
 5. Draw the Pot
Redraw the outlines of the three cacti, making sure the outlines don't go through the ridges. Redraw the pot, adding the edge of the rim.
 6. Flower Petals
Using the small circle as a guide, draw four flower petals with wavy lines. Draw more petals behind them with additional wavy lines. Draw four tiny circles for the flowers center, then draw short lines on the petals.
Draw in the edges of the leaves on the tall cactus by adding a line to each leaf. Shade the ground with groups of short lines.
 7. Shading
Shade the center cactus with short lines between the rows of spines, being careful not to shade over the spines. Then shade around the spines with more short lines to give a rounded look.
 Use short lines to shade the bottoms and sides of the left-hand cactus and its leaves. Use short lines to shade the tall cactus between the ridges. Shade the sides and bottom of the pot.
Guess what? Your flower and plant drawings are complete. Excellent effort! If you're still feeling creative, we have a few special arrangements for you.
Our two final drawings include plant arrangements and flower arrangements. Continue to the next page to learn how to draw a plant arrangement.
No comments:
Post a Comment